
Build a Private Off-Grid Mesh Network With No Cell Service or Wi-Fi
Published by Vivian van Zyl in Meshcore the 06/10/2026 at 10:49 pm

Sending messages over more than a mile without cell towers, without Wi-Fi, and without paying a monthly fee sounds like a gimmick until you actually do it.
That is exactly what a small MeshCore setup can do. With one solar repeater mounted outside and one handheld companion node in your hand, you can create a private off-grid communication network that keeps working independently of the internet.
This setup uses the Seeed Studio MeshCore starter kit, which includes the MeshCore Starter Kit with a SenseCAP Solar Node P1 Pro and a Wio Tracker L1 Pro. Both come ready for MeshCore, which makes this one of the easiest ways to get a practical LoRa mesh up and running.
Table of Contents
- What MeshCore actually is
- The two pieces that make this network work
- Set up the repeater first
- Mount the repeater where it can actually do its job
- Set up the companion node
- Verify the repeater is visible from the companion node
- Manage the repeater remotely from the app
- How discovery and privacy work in MeshCore
- Test direct messaging across the mesh
- Use public channels too
- What you end up with
- Practical setup checklist
- FAQ
What MeshCore actually is
Before touching the hardware, it helps to understand what MeshCore is doing differently.
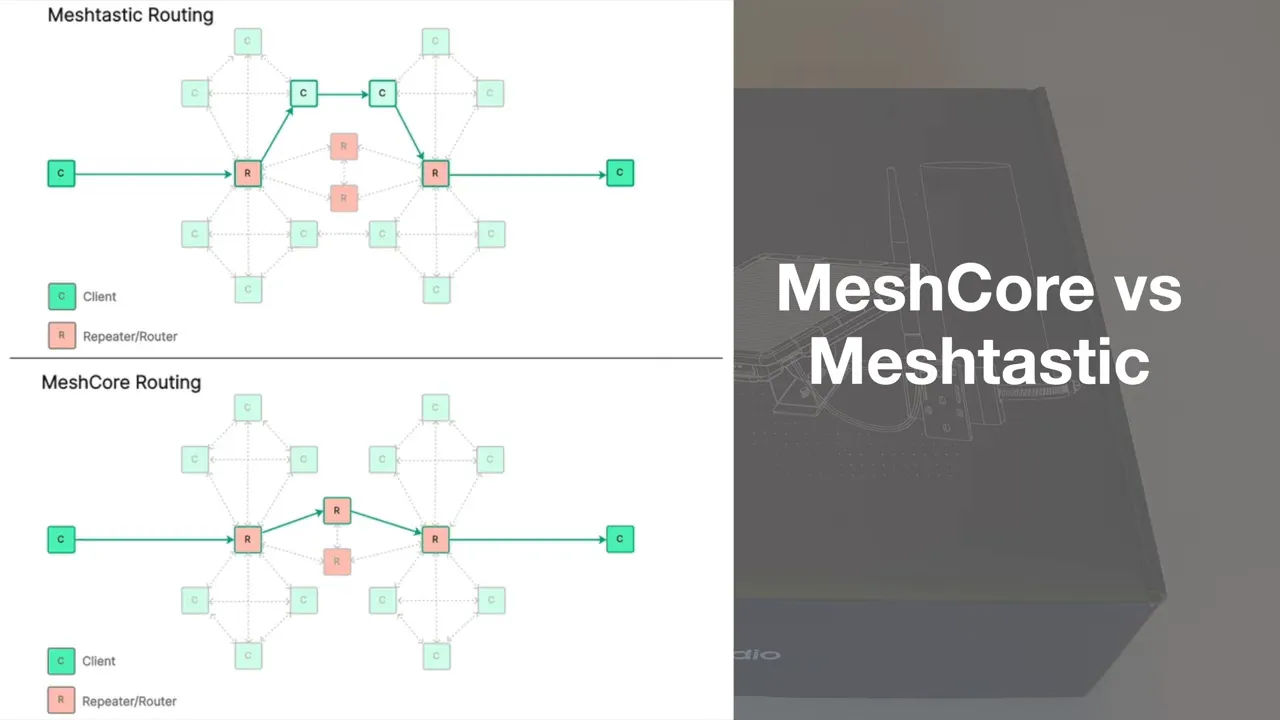
MeshCore is firmware built around LoRa, which stands for long range radio. LoRa is designed for tiny packets of data traveling surprisingly long distances while using very little power. It is not about streaming video or moving huge files. It is about reliable low-power communication.
The important part is the network model.
MeshCore uses a routed mesh architecture. Instead of blasting every packet through every node in the network, messages are routed through a better path. In practical terms, that gives you a few advantages:
- better reliability
- better scalability as the network grows
- better battery life
- less unnecessary traffic across the mesh
That is the big distinction from flooding-style mesh systems, where every node gets hammered with every packet. Routed mesh is simply a cleaner approach when you want a network that can grow and keep working efficiently.
The two pieces that make this network work
The starter kit gives you the core building blocks you need.
1. SenseCAP Solar Node P1 Pro
This is the repeater. It is the part you mount outside somewhere elevated so it can stay alive around the clock and extend your network.
It comes preloaded with MeshCore repeater firmware. Internally it is built around a low-power nRF52840 class architecture and an SX1262 LoRa radio, which is exactly the kind of combination you want for a solar-powered always-on node. There is also a built-in GPS module.
On the outside, you get:
- an integrated solar panel on the front
- mounting hardware on the back
- an antenna connection
- a USB port for maintenance or updates
- indicator lights and buttons
2. Wio Tracker L1 Pro
This is the companion node. Think of it as the handheld part of your setup.
It also comes preconfigured with MeshCore companion firmware and pairs to the MeshCore mobile app over Bluetooth. It has a rechargeable internal battery, a small display, USB charging, and a rugged enclosure. There is no assembly drama here. It is ready to use.

If you want the individual hardware pieces, the handheld is the Wio Tracker L1 Pro and the repeater is the SenseCAP Solar Node P1 Pro.
Set up the repeater first
Start with the solar repeater.
The first rule is simple and important: attach the antenna before powering the unit on. Do not skip that.
Screw the antenna onto the repeater first. If you want more flexibility in placement, the kit also includes an antenna extension so you can separate antenna placement from the main body if needed.
Once the antenna is attached, put the unit where it can see sunlight and power it on using the onboard power button. If the panel is getting solar input, you should see the relevant indication from the unit.
Configure the repeater from a computer
Even though the device arrives preflashed, you still want to configure it correctly for your region and network settings.
Connect the repeater to your PC with USB, then open the MeshCore flasher and configuration tool at MeshCore flasher.
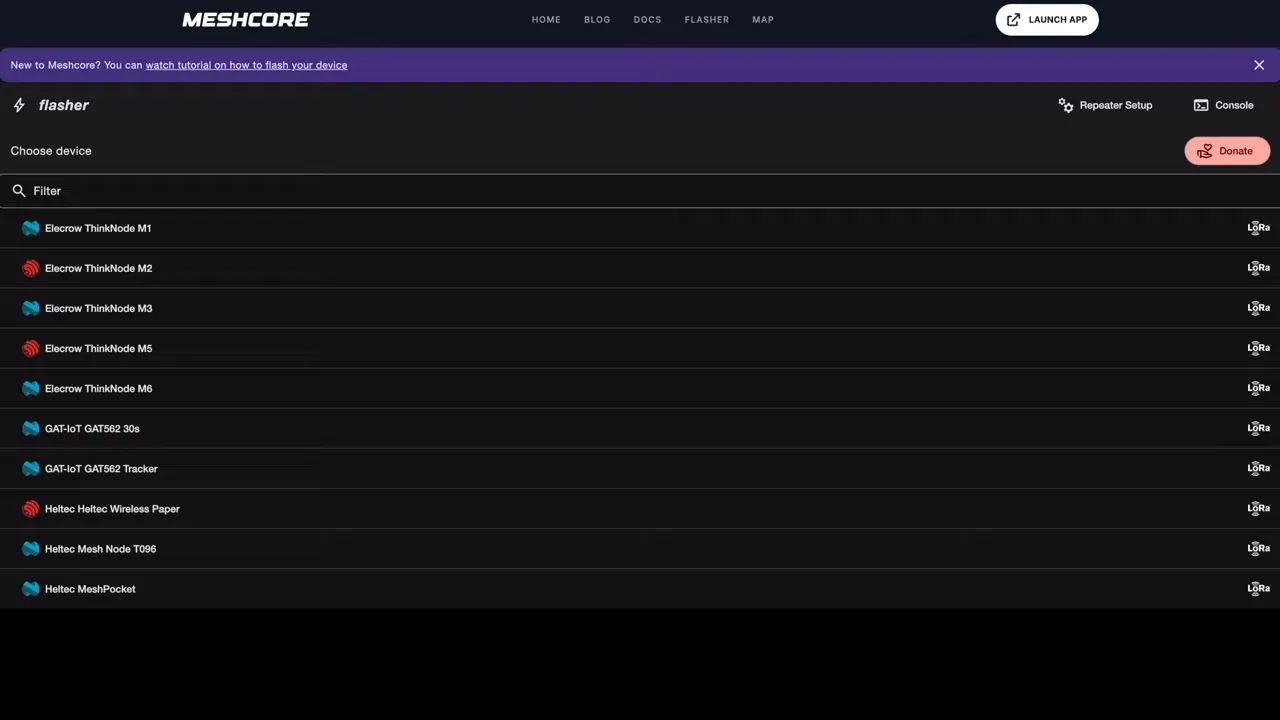
From there:
- Choose Repeater Setup.
- Click Connect.
- Select the repeater from the USB device list.
- Set an admin password.
- Optionally leave the guest password blank if you want telemetry to be viewable without logging in.
- Set the correct region. This is the most important part.
- Optionally fill in owner information.
- Save and reboot the device.
If you are on Windows and the device does not appear in the USB selection popup, you may need a driver. The walkthrough points to this Windows driver guide. On many Linux and Mac setups, that extra step is usually not needed.
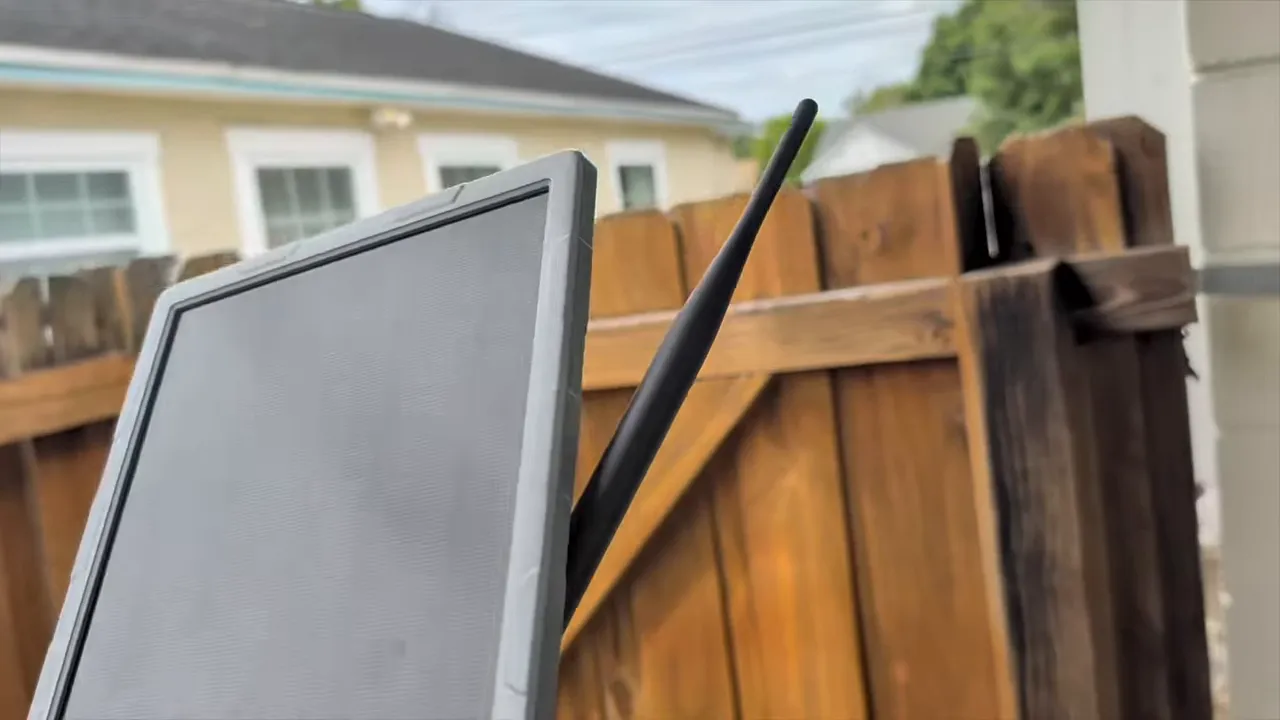
Mount the repeater where it can actually do its job
Once the repeater is configured, get it outside.
The number one thing that improves range is elevation. Higher placement generally means better line of sight, and with LoRa that matters a lot. These radios can handle some walls and trees, but height still makes a dramatic difference.
Good mounting spots include:
- under a roof edge
- on a second-story exterior wall
- on a fence post
- on a mast or rooftop location
- on a tree or elevated structure if mounted safely
Also make sure the solar panel faces the sun well enough to keep the repeater charged. A perfect solar angle is nice, but a bad radio location will hurt you more than a slightly imperfect solar angle. You want a practical balance between sun exposure and elevation.
Set up the companion node
Now move on to the Wio Tracker L1 Pro.
Same rule as before: attach the antenna before powering it on.
After attaching the antenna, use the side button to turn it on. The display should show that MeshCore is loading, along with the firmware version installed on the unit.
Pair it to the MeshCore mobile app
Install the MeshCore app from the Android or iOS app store, then open it and scan for nearby devices.
The companion node should appear in the list. Select it, then confirm the pairing PIN shown on the device screen. Once paired, the app connects over Bluetooth.
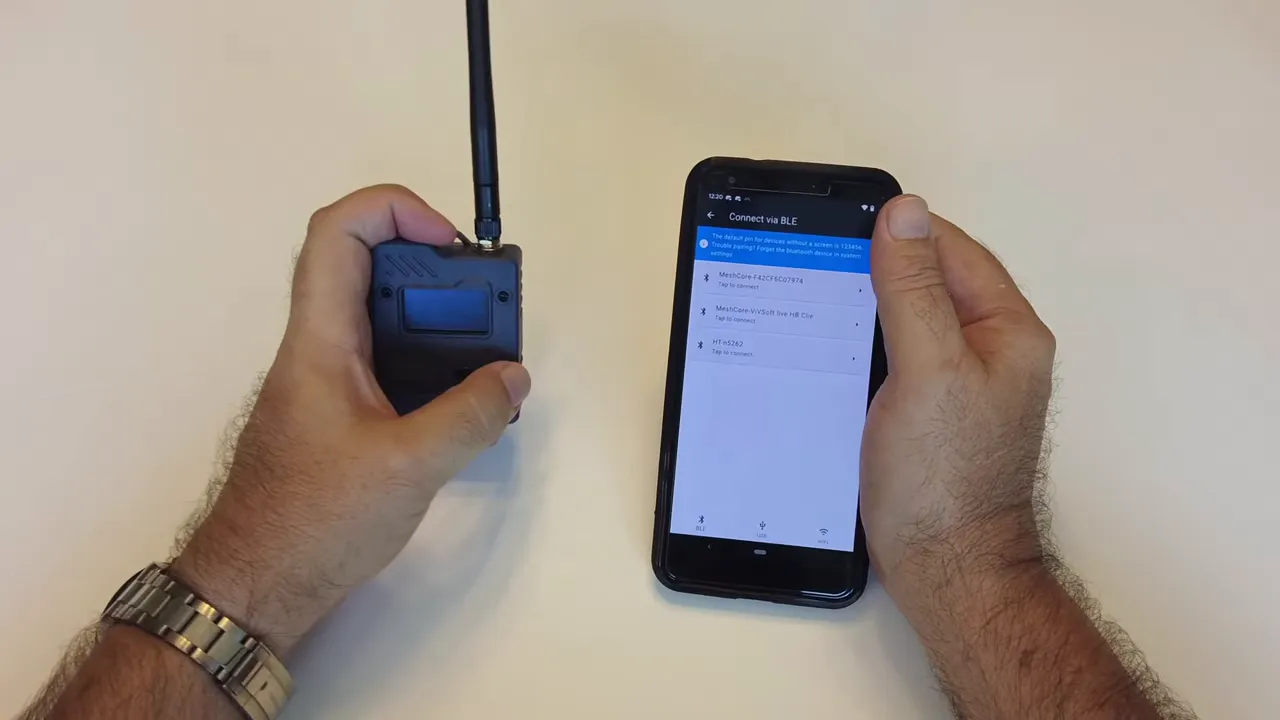
After pairing, give the node a meaningful name so it is easier to identify later. Something like a location, role, or personal label is far better than leaving a generic default.
Then set the region on the companion node to match the repeater. If the repeater is configured for USA and Canada, the companion node must use that same region too.
At that point, the handheld should remain connected to your phone and be ready to discover nearby nodes.
Verify the repeater is visible from the companion node
Once both devices share the same region, the companion node should discover the solar repeater automatically when it boots and joins the local mesh.
If it does not show up right away, you can manually scan from within the app by going into the tools area and using the nearby node discovery options.
When the repeater appears, you can inspect telemetry. If you left the guest password blank, you can immediately see useful information such as battery charge and temperature. That gives you quick confirmation that the repeater is online and healthy.
Manage the repeater remotely from the app
This is one of the nicer parts of the setup.
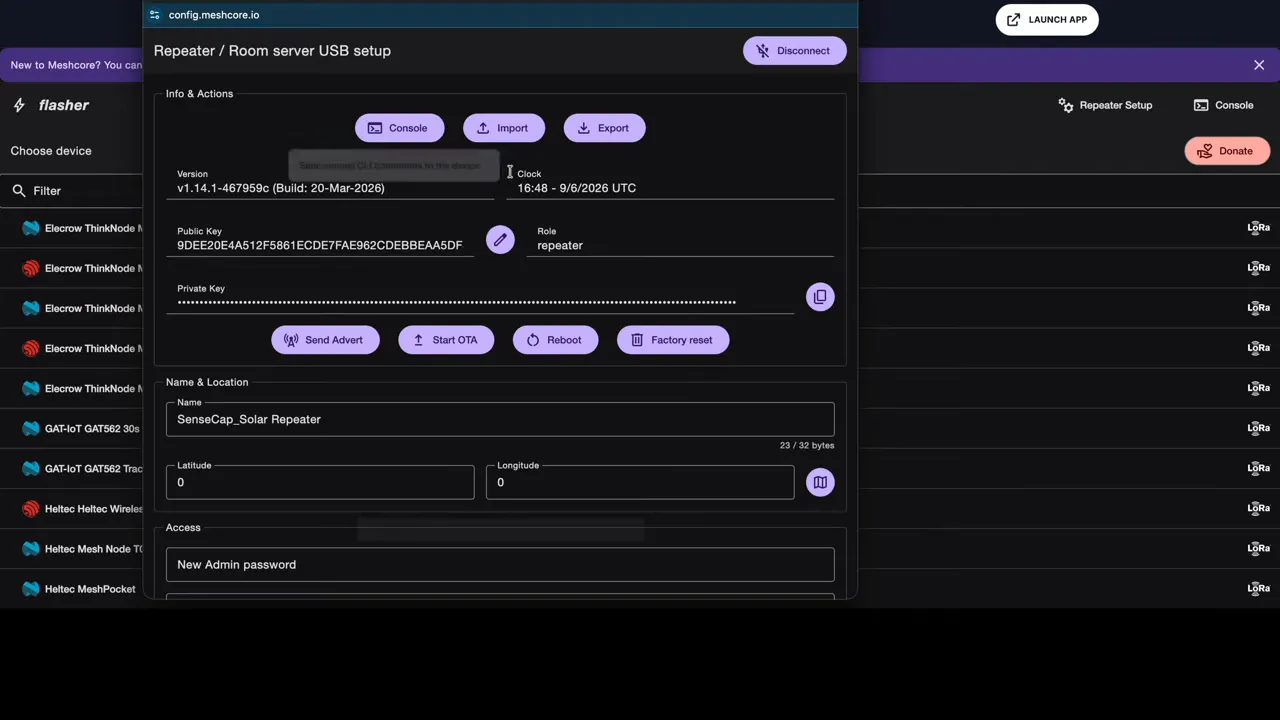
Once your companion node can reach the repeater over MeshCore, you can log in to the repeater from the app using the admin password you set earlier. That means your handheld can act as a management tool for the repeater even after it is mounted outside.
From the repeater management screen you can:
- request full status details
- check battery voltage
- rename the repeater
- update owner information
- change passwords
- sync the repeater clock
- view GPS position data if available
- send an advert so other nodes can discover it
- confirm the configured region
The GPS lock on a repeater is not always urgent, but it is there if you want positional data. Clock sync, however, is worth doing so the repeater stays properly aligned.
How discovery and privacy work in MeshCore
MeshCore is built with privacy in mind, and that affects how messaging behaves.
If one companion node tries to send a direct private message to another node that has not yet added it as a contact, that message will fail. That is expected behavior.
The way around that is node discovery.
A flood route message, which in this context is effectively an advert, announces your presence so nearby nodes can become aware of you. If the receiving node is configured to auto-add discovered nodes, the two sides can then recognize each other and private direct messaging starts working.
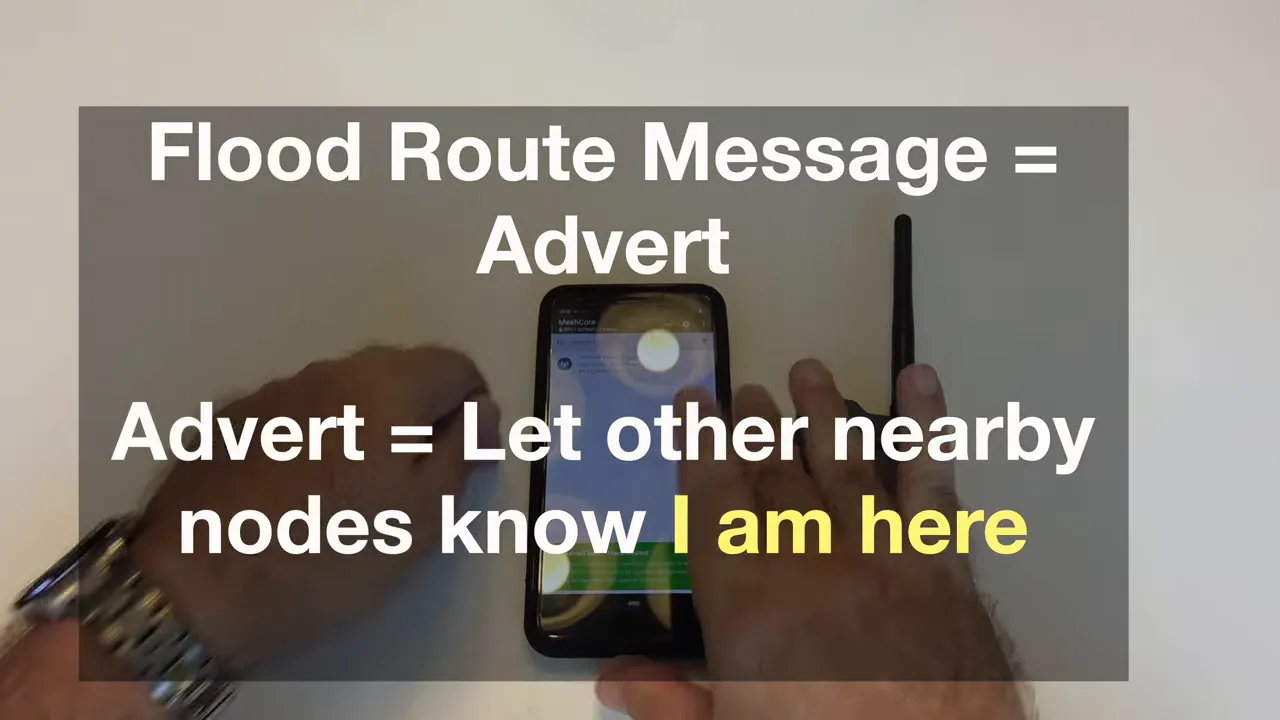
So the flow looks like this:
- Node A sends an advert or flood route message.
- Node B discovers Node A.
- The nodes are added to each other, manually or automatically.
- Private direct messages can now be delivered.
Test direct messaging across the mesh
With the repeater mounted outside and the handheld node connected to the phone, it is time to send messages.
In the demo, one companion node first advertises itself, then a second companion node discovers it. Once both nodes know about each other, direct messaging starts working normally.
The important point is that the message travels over the LoRa mesh, not over the internet. No Wi-Fi connection is needed for the network path itself, and the setup was specifically demonstrated with Wi-Fi disabled to make that point clear.
If you attempt a private message before the nodes know each other, it fails. After discovery and auto-add kick in, the same message goes through and is received on the second node.
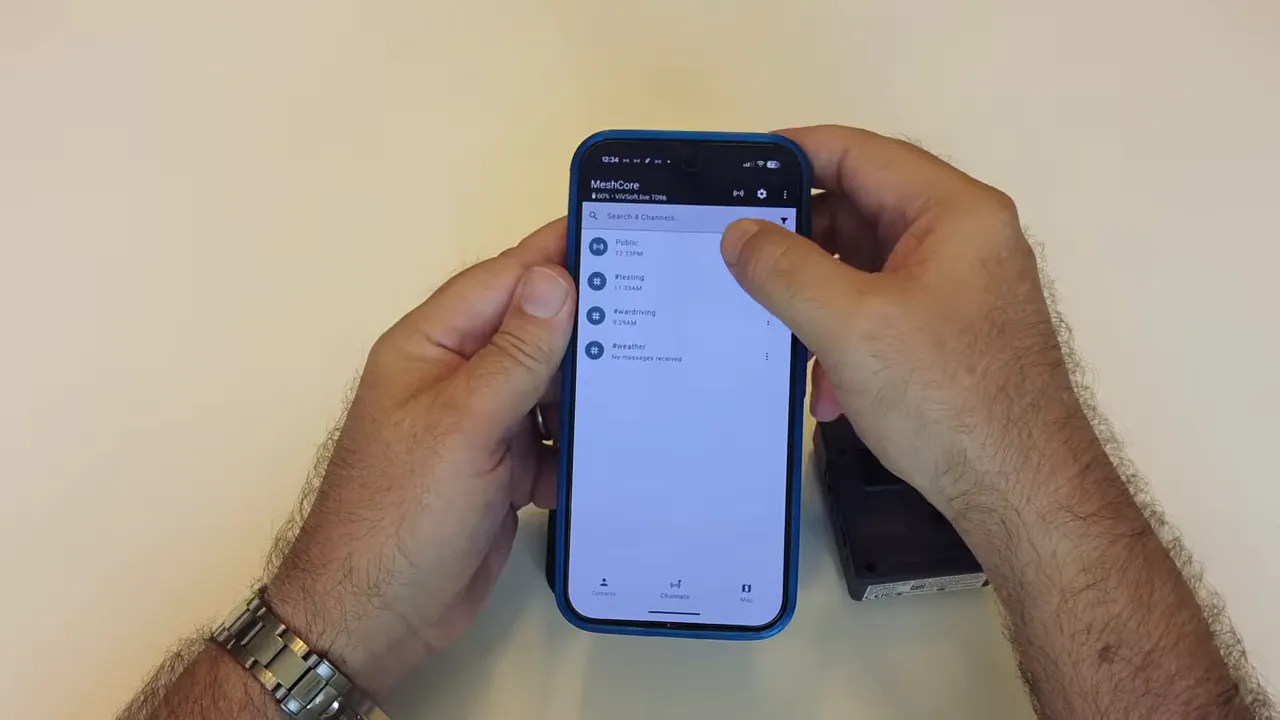
Use public channels too
MeshCore is not limited to one-to-one messages.
You can also post into public channels. In the app, the public channel is available for non-direct messaging, and messages sent there can be seen by nodes participating in that channel.
This gives you two useful communication patterns:
- Direct private messages for one-to-one communication
- Public channel messages for broader shared communication
That combination makes the network flexible. You can keep some conversations private while still maintaining an open coordination channel.
What you end up with
Once both devices are configured, the repeater is mounted, and the companion node is paired, you have a real off-grid communication network.
At the smallest scale, it is just two building blocks:
- one solar repeater keeping a local MeshCore network alive
- one companion node that lets you access that network from your phone
From there, you can expand with more repeaters, more handhelds, or more fixed nodes. The routed architecture is what makes that growth practical.
For preppers, outdoor use, emergency communication, or just plain curiosity, this is one of the more compelling ways to stay connected when the normal network stack is gone.
Practical setup checklist
- Attach both antennas before powering either device on.
- Configure the repeater from USB using the MeshCore flasher.
- Set a proper admin password.
- Make sure both devices use the same region.
- Mount the repeater high and in good sunlight.
- Pair the companion node to the MeshCore mobile app over Bluetooth.
- Name the companion node clearly.
- Confirm the repeater shows up in nearby nodes.
- Use adverts or flood route messages for initial discovery.
- Then move on to private messages or public channels.
FAQ
Do I need internet access for messages to travel across the mesh?
No. The messages move over LoRa radio through the MeshCore network. The phone only connects locally to the companion node over Bluetooth.
What happens if my direct message fails?
Usually it means the destination node has not added your node yet. Send an advert or flood route message first so discovery can happen, then try the direct message again.
Why is the region setting so important?
Both the repeater and the companion node must use the same regional radio settings. If the regions do not match, the devices will not communicate properly.
Can the solar repeater be managed after it is mounted outside?
Yes. Once it is reachable through the mesh, you can log in from the app using the repeater admin password and manage status, settings, clock sync, and other details remotely.
Do these devices need to be flashed before use?
The kit arrives preflashed with MeshCore firmware, so you do not need to start from a blank device. You still need to configure the repeater and verify settings like passwords and region.
Where should I mount the repeater for best range?
As high as you can place it while still giving the solar panel decent exposure. Elevation has a major impact on range, so rooftops, upper walls, poles, or high fence locations are all better than low placements.