
How to Build a MeshCore Observer with Heltec V3
Published by Vivian van Zyl in Meshcore the 04/29/2026 at 12:37 am

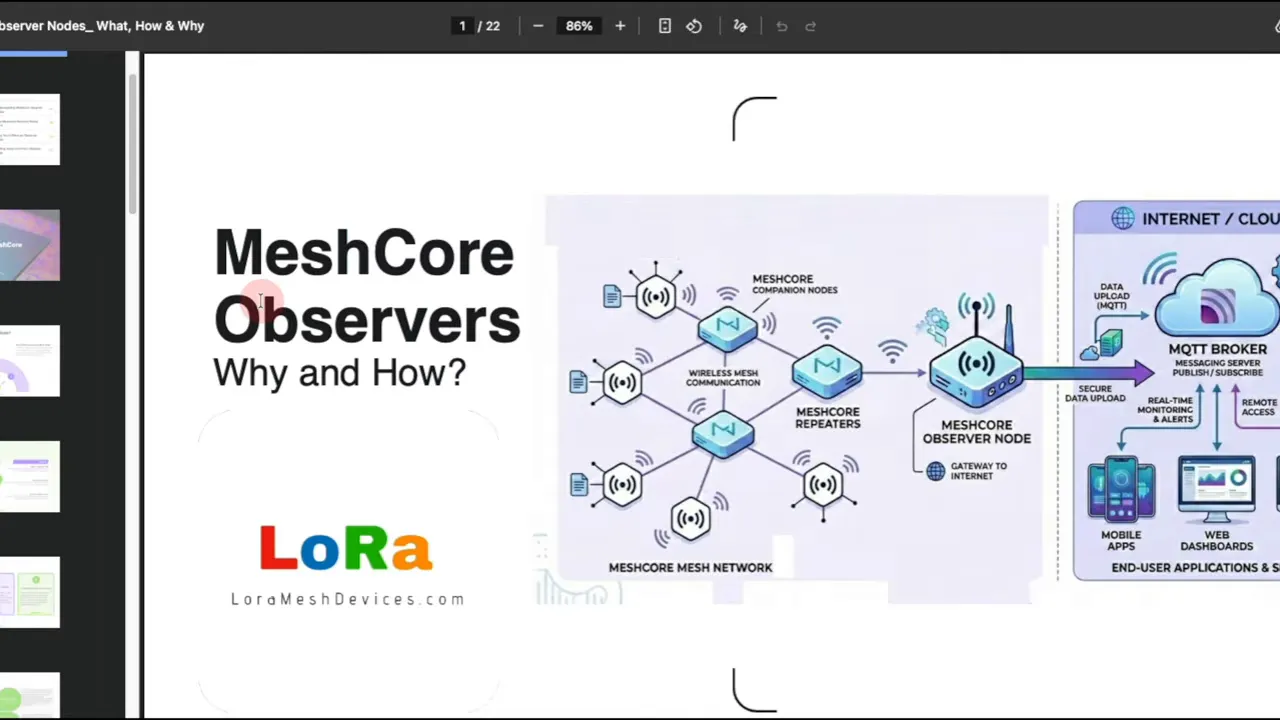
A MeshCore Observer is one of those things that sounds a bit mysterious at first, but it is actually very straightforward. It is basically a read-only node that sits on your mesh, listens passively, and reports what it sees to a central place over the internet.
It does not route traffic. It does not act like a repeater. It does not replace your normal client nodes. Its whole job is to collect useful network data such as active nodes, packet paths, signal quality, and general network health, then send that information up to MQTT so apps can do something useful with it.
If you want better visibility into your network, easier troubleshooting, coverage mapping, or just a clearer picture of what is happening on your local mesh, adding a MeshCore Observer is a really good idea.
Table of Contents
- What a MeshCore Observer Actually Does
- Why Every Local Mesh Community Should Have One
- How the Data Flow Works
- The Simple Hardware Approach I Chose
- Getting the Observer Firmware
- Flashing the MeshCore Observer to a Heltec V3
- Configuring Wi-Fi and Location in the Serial Console
- What Happens After Setup
- Using MeshMapper to Visualize Observer Data
- A Real Example of Packet Tracking
- Live Mapping Packet Paths
- What the MeshCore Observer Is Not
- Final Thoughts
- FAQ
- Useful Links
What a MeshCore Observer Actually Does
Think of a normal MeshCore network as a mix of companions or client nodes, plus repeaters. Those devices are busy participating in the mesh. They send messages, relay packets, and keep the network moving.
A MeshCore Observer is different. It simply sits there and listens.
When it sees traffic on the mesh, it reports that data over the internet to an MQTT broker. From there, apps can use the information to visualize the network and help you understand what is going on.

That makes the observer useful for things like:
- Network mapping
- Coverage mapping
- Troubleshooting and diagnostics
- Performance monitoring
- Contributing to the wider LetsMesh ecosystem
- Security awareness, including spotting suspicious or unauthorized nodes
The mesh will still run perfectly fine without an observer. This is important. A MeshCore Observer is not required to make the network function.
But if you do have one in your area, the network becomes much easier to understand and manage because now that local activity can be published and visualized.
Why Every Local Mesh Community Should Have One
If you have a community network, it really helps to have at least one MeshCore Observer in the area. Without it, traffic is still happening, but you are mostly blind to the bigger picture.
With an observer in place, everyone benefits from shared visibility. You can begin answering practical questions like:
- Which nodes are currently active?
- How far is traffic actually propagating?
- Which repeaters are being used most often?
- Are there weak coverage spots?
- Are packets following the path you expected?
That is the real value here. A MeshCore Observer turns the mesh from something you hope is working into something you can actually inspect.
How the Data Flow Works
The overall flow is simple:
- Your normal MeshCore network runs as usual with clients and repeaters.
- The MeshCore Observer listens passively to activity on that mesh.
- The observer uses an internet connection to send what it hears to MQTT brokers.
- Apps consume that MQTT data and turn it into maps, packet traces, and other useful visualizations.
That is why the observer matters so much. It bridges local RF activity to tools that can make sense of it.
The Simple Hardware Approach I Chose
There are a few ways to stand up a MeshCore Observer, but I went with the simplest route.
You could run supporting pieces on something like a Raspberry Pi, but then you are also taking on the overhead of keeping another computer online and maintained all the time. For my setup, I wanted something cleaner and easier.
So I used a Heltec V3 that I already had available in my stack of nodes.
The reason this worked nicely is that the Heltec V3 has network capability, so I could connect it to Wi-Fi and let it push observer data out to the internet directly.
That made it a practical choice for an always-on MeshCore Observer without turning the whole project into something more complicated than it needed to be.
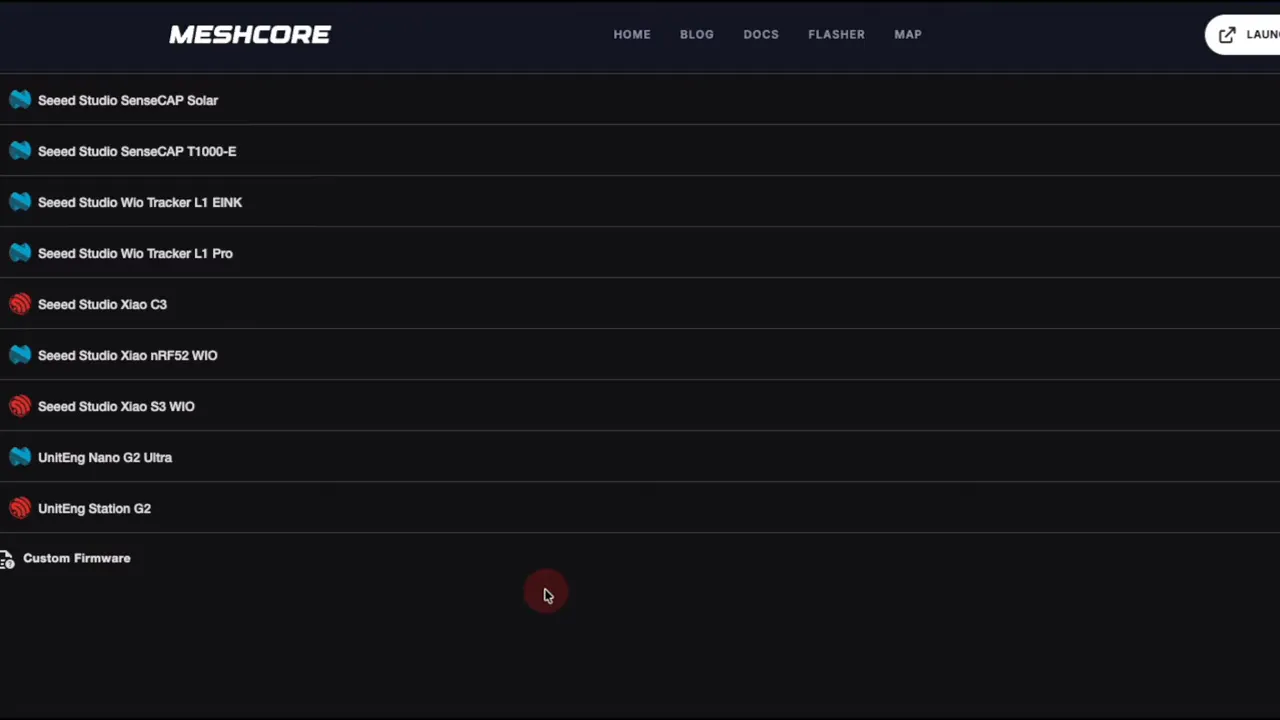
Getting the Observer Firmware
The custom observer firmware can be found through the LetsMesh forum. There is a write-up there that walks through the process and helps identify which devices support this observer setup.
On that firmware page, you select the node type you want and then choose the hardware platform. Supported options include several device types, including the Heltec V3.
Once you choose the correct hardware and confirm that you understand what you are downloading, you can grab the firmware file you need.
The key point here is that you are not flashing the standard firmware image. You are downloading a custom firmware build intended for the observer role.
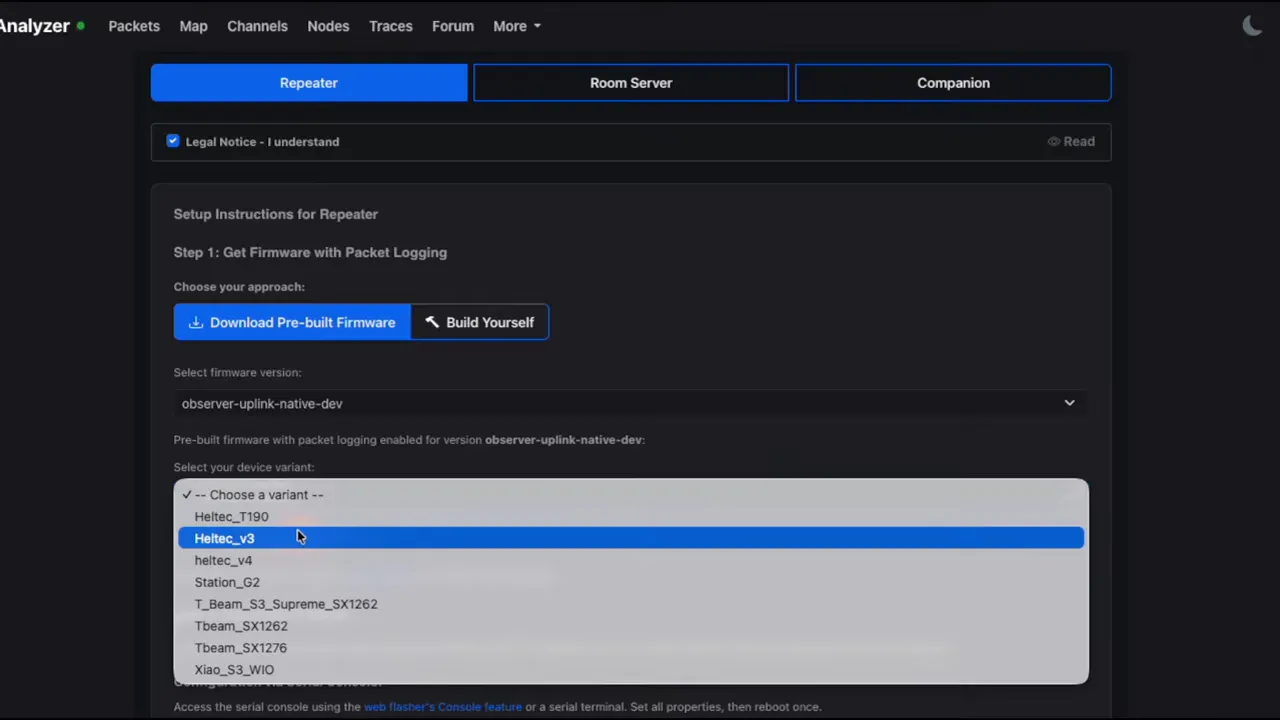
Flashing the MeshCore Observer to a Heltec V3
After downloading the firmware, head over to the MeshCore flasher on the MeshCore website.
From there:
- Open the web flasher.
- Choose custom firmware instead of the normal node firmware option.
- Upload the observer firmware file you downloaded.
- Flash it to the Heltec V3 like you normally would.
That part is very similar to a normal firmware flash. The main difference is simply that you are using the custom observer image.
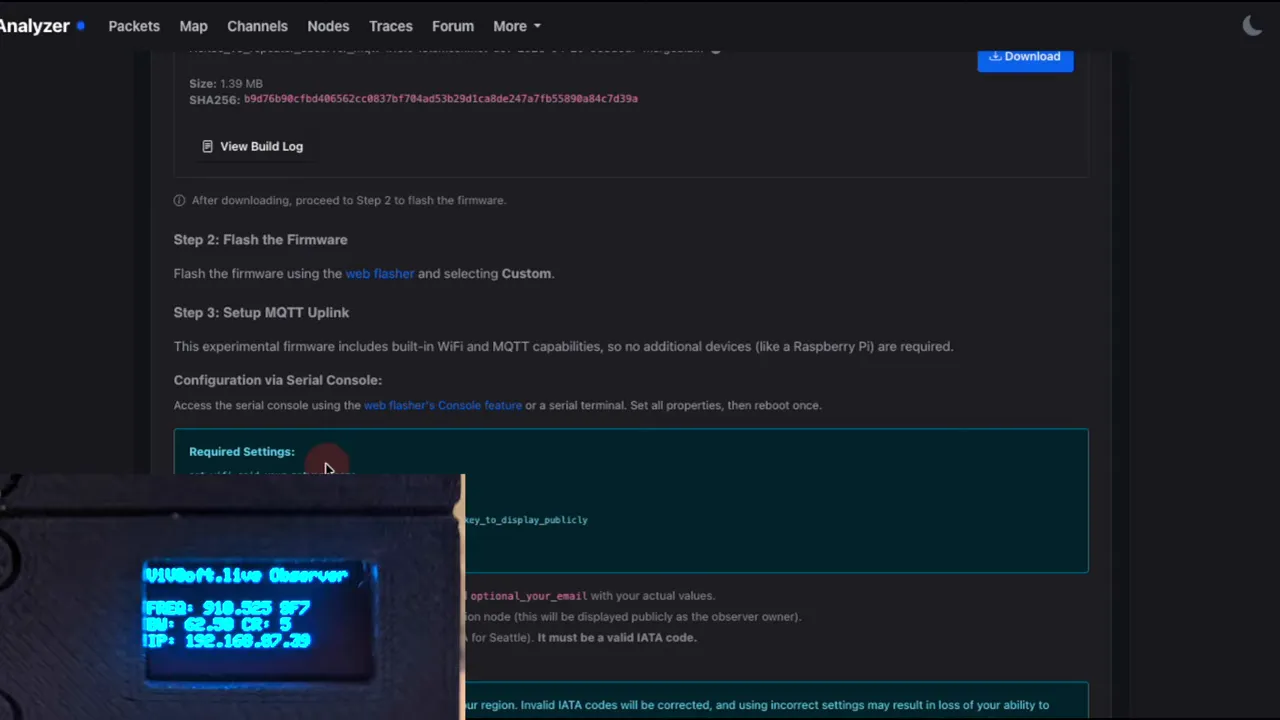
Configuring Wi-Fi and Location in the Serial Console
Once the firmware is flashed, the next step is to connect to the device through the serial console and set a couple of values.
This is where the observer becomes usable on your network.
You need to configure:
- Wi-Fi SSID
- Wi-Fi password
- Closest airport code
The Wi-Fi settings are required because the MeshCore Observer needs internet access to publish data to MQTT.
The airport code is also required. For example, in the Tampa area, the code used was TPA.
There are also optional fields where you can provide contact details such as your email address or public key so people can get in touch regarding your observer.
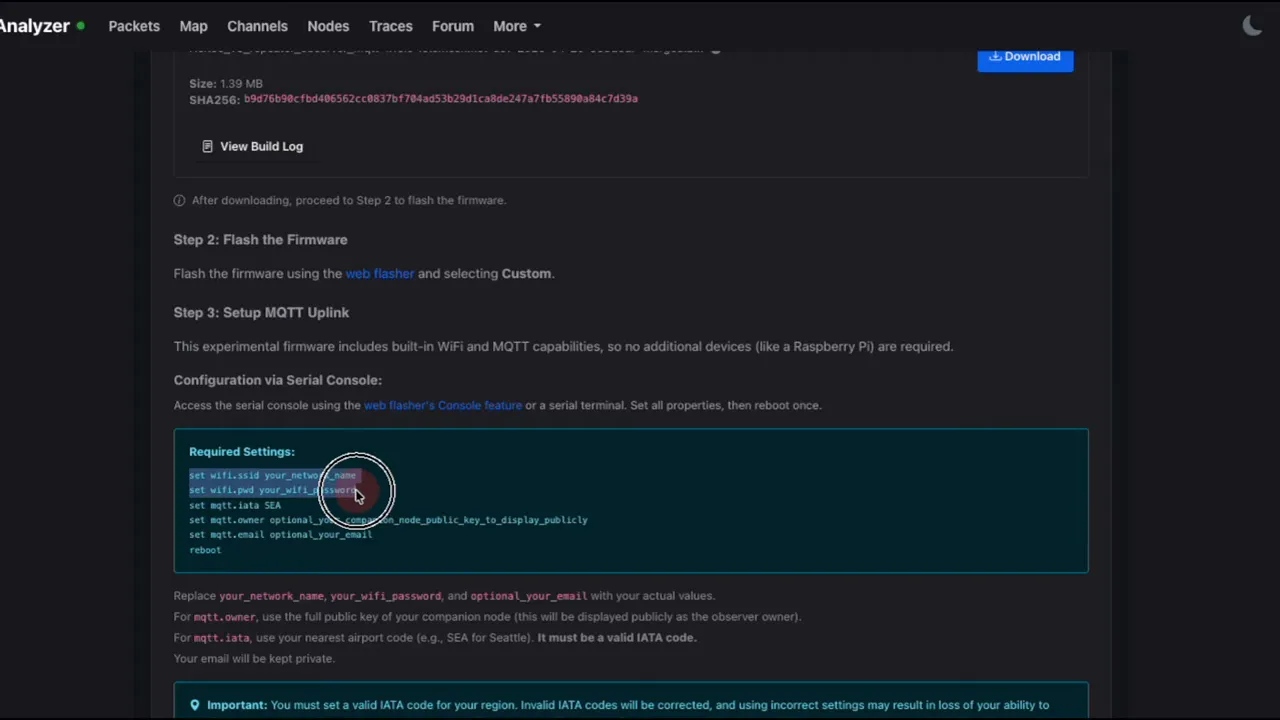
One practical tip I always recommend is to put devices like this on a guest network rather than your main network. That keeps things a bit cleaner and avoids giving experimental nodes unnecessary access to your primary LAN.
After setting the required values, reboot the node.
Once it comes back up, you should see that the Heltec V3 now has an IP address. That is the sign that it is connected to Wi-Fi and ready to begin feeding data into the MQTT servers.
What Happens After Setup
At this point, your MeshCore Observer is basically done.
You configure the radio side as normal, set the serial values for network access and location, and then it begins contributing data automatically.
From there, every time it hears mesh traffic, it can report what it sees upstream for use in apps.
That is the beauty of the setup. Once it is in place, it quietly does its job without needing to participate in packet routing.
Using MeshMapper to Visualize Observer Data
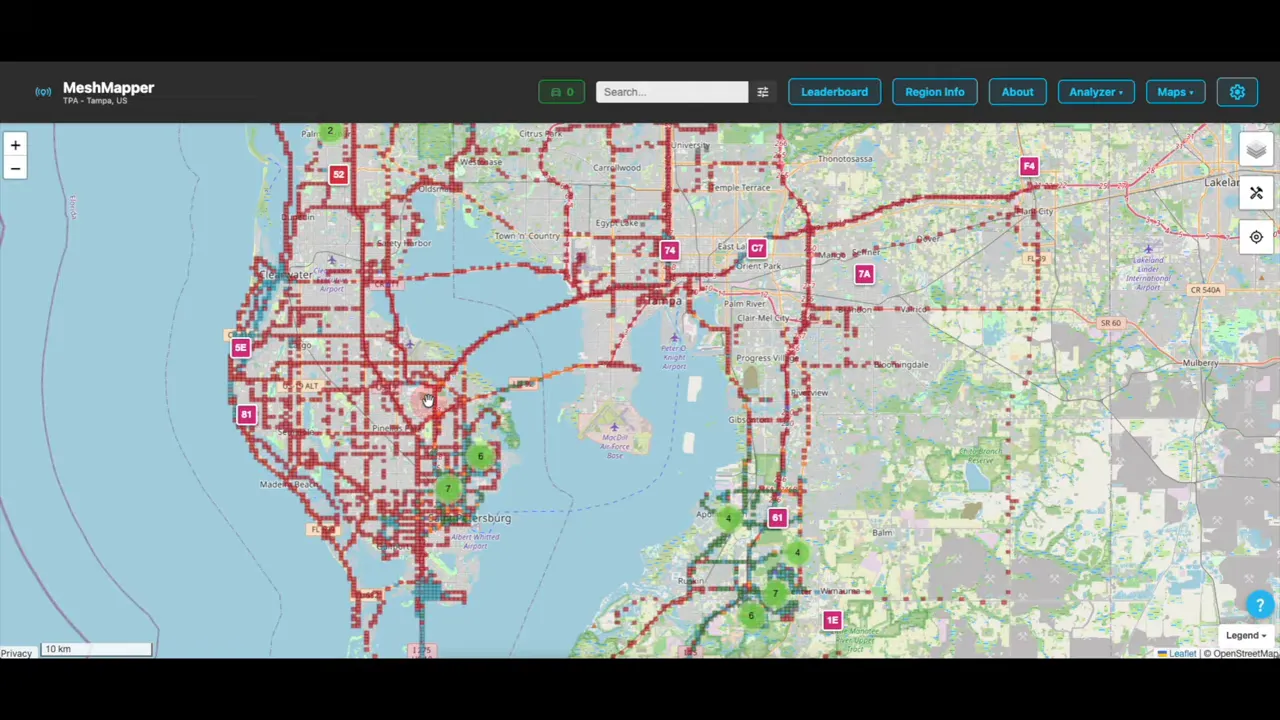
One of the most useful examples of observer-powered visualization is MeshMapper.
MeshMapper can consume data from LetsMesh and show useful details on a map. Depending on the data available, it can help with things like seeing where signal was picked up, where it was not, and how packets move across an area.
In the Tampa and St. Petersburg area, the observer showed up on the map as an active contributor. That confirmed it was online and publishing properly.
The really interesting part is the packet view.
This is where a MeshCore Observer starts proving its worth in a very practical way. You can begin seeing what traffic was heard, which nodes were involved, and how messages were propagated through the network.
A Real Example of Packet Tracking
To test the setup, a small client node was used along with the mobile app to send a message into the network.
The hardware used for that live test was a Seeed Wio Tracker L1, acting as a mesh client. A simple test message was sent from the app.

Once that message hit the network, the observer picked it up and reported it. In the packet data, it was possible to see:
- The original text message
- The rebroadcast path across nearby nodes
- A reply from a bot
- The observer that captured and forwarded those packet details upstream
That gives you a much clearer sense of what actually happened on the mesh. Instead of just knowing that a message was sent and received, you can see how it moved.
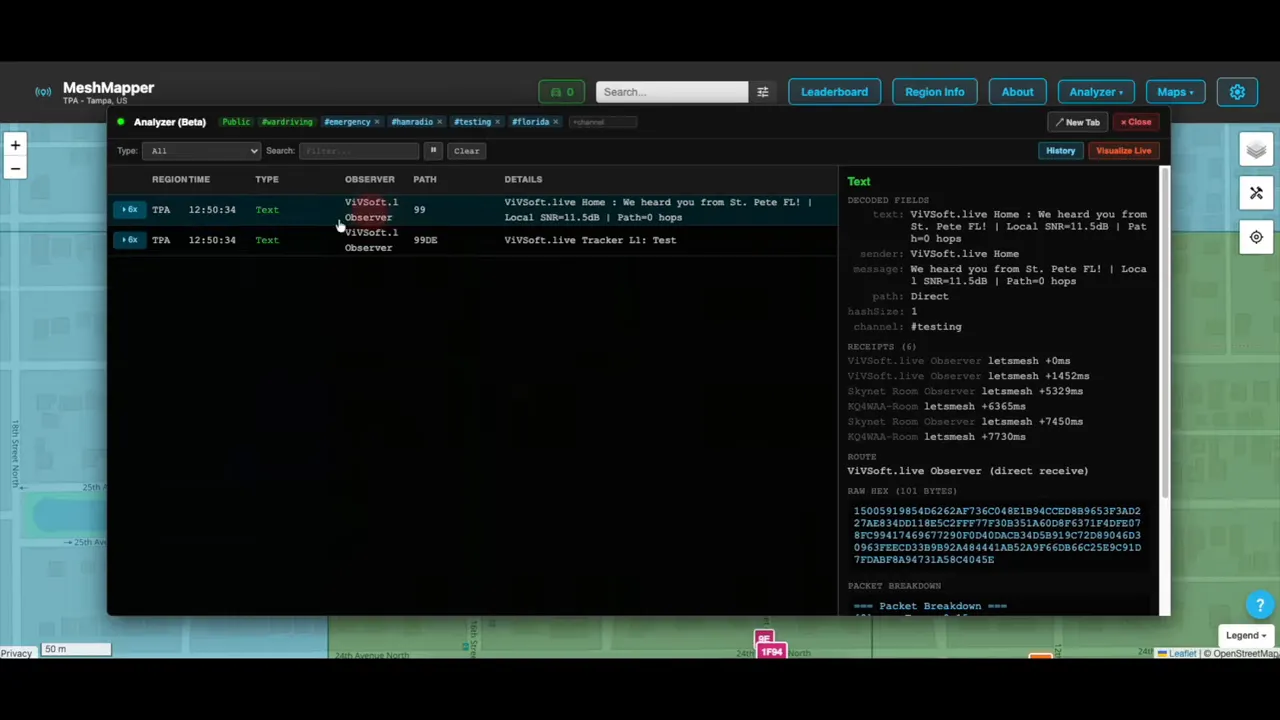
This kind of visibility is especially useful when a network is still growing. Even in a smaller area with only a modest number of nodes, you can already start verifying packet movement and relay behavior.
Live Mapping Packet Paths
One of the coolest parts of the whole setup is seeing packet movement drawn out visually on the map.
After sending another test message, MeshMapper showed the relay path in real time. The message originated locally, traveled outward, and then appeared at other points in the area, including Apollo Beach and back toward another nearby node.
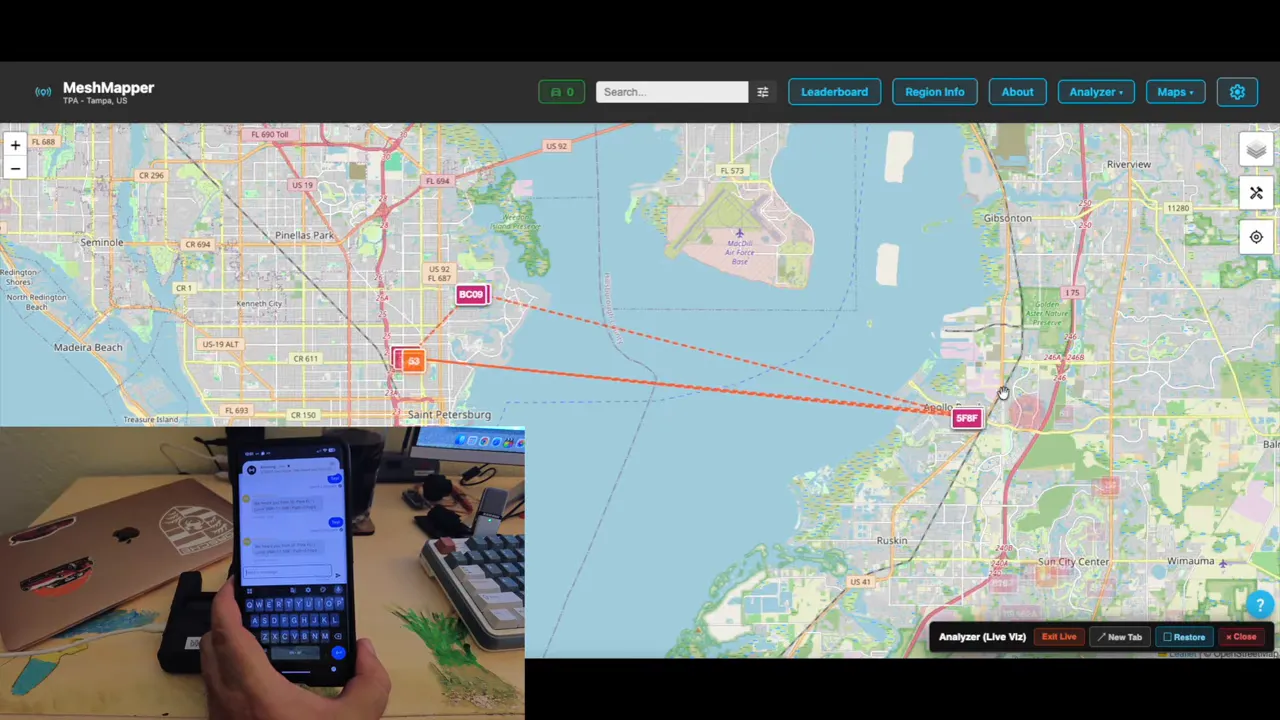
That sort of visual pathing is exactly what makes a MeshCore Observer so valuable. It turns invisible RF behavior into something you can inspect and reason about.
In a larger network, this becomes even more interesting because you can start seeing more complex relay paths, denser propagation patterns, and a clearer picture of which infrastructure is doing the heavy lifting.
What the MeshCore Observer Is Not
It is worth being very clear about this, because it helps avoid confusion when planning a deployment.
A MeshCore Observer is not:
- A repeater
- A normal chat client
- A routing node
- A required component for mesh traffic to function
It is a passive listener that reports what it hears.
That limited role is exactly why it is so useful. Because it is not busy participating in routing decisions, it can focus on collecting and exporting network data.
Final Thoughts
If you already have a working MeshCore network, adding a MeshCore Observer is one of the easiest ways to get more insight out of it.
Using a Heltec V3 made the process simple. Flash the custom firmware, connect to the serial console, set Wi-Fi, set your nearest airport code, reboot, and let it start feeding data to MQTT.
From there, apps like MeshMapper can show you packet paths, relay behavior, and the overall health and shape of your local mesh.
For anyone building out a community network, I really think it is worth standing up at least one MeshCore Observer in the area. The network will run without it, but once you have that visibility, it is hard to want to go back.
FAQ
What is a MeshCore Observer?
A MeshCore Observer is a read-only node that passively listens to mesh traffic and sends network data over the internet to MQTT brokers. It does not route packets or act as a repeater.
Does a MeshCore Observer affect routing?
No. A MeshCore Observer does not take part in routing. It only listens and reports what it hears.
Can the mesh network work without a MeshCore Observer?
Yes. The mesh works without an observer. The observer simply adds visibility, monitoring, and reporting features that help with mapping, diagnostics, and analysis.
Why do I need Wi-Fi for a MeshCore Observer?
The observer needs internet access so it can send collected packet and network data to MQTT brokers. That is how external apps are able to visualize and use the data.
Why is the closest airport code required?
The observer setup requires the nearest airport code as part of its configuration. An example used here was TPA for the Tampa area.
What hardware can I use for a MeshCore Observer?
Several supported devices can be used, including the Heltec V3. In this setup, the Heltec V3 was chosen because it was already available and supports network connectivity for reporting observer data.
What app can I use to see MeshCore Observer data?
MeshMapper is one useful example. It can show observer-fed packet data and visualize message paths and network activity on a map.
Useful Links
Links: (Note: As an affiliate, I earn from qualifying purchases)
-
Seeed T1000E (Use code S0G9HWFL for a discount)