
DIY Meshtastic Solar Node: Build Your Own Self-Sustaining LoRa Device
Published by Vivian van Zyl in Meshtastic the 06/18/2025 at 08:19 pm

Creating a reliable, cost-effective, and self-sustaining Meshtastic Solar Node is a rewarding project for anyone interested in IoT, mesh networking, or LoRa technology. In this comprehensive guide, I’ll walk you through how to build your own solar-powered LoRa node using affordable components like the RakWireless WisBlock, an 18650 battery, an MPPT charge controller, and a cooling fan — all housed in a weatherproof case enhanced with custom 3D-printed parts. Whether you’re a hobbyist or a professional, this build offers a practical way to deploy standalone nodes that can run independently in the field.
Table of Contents
- Overview of the Meshtastic Solar Node Concept
- Key Components and Materials
- Building the Solar Node: Step-by-Step
- Assembly and Final Connection
- Testing the Meshtastic Solar Node
- Summary and Next Steps
- Frequently Asked Questions (FAQ)
Overview of the Meshtastic Solar Node Concept
My goal was to develop a Meshtastic Solar Node that is cheap, compact, and completely self-sufficient. Over the years, I’ve built several solar nodes, each iteration improving on the last by optimizing cooling, power management, and enclosure design. This project uses a full RakWireless WisBlock LoRa module, paired with an 18650 battery and an external MPPT charging module to efficiently manage solar power input.
Key Components and Materials
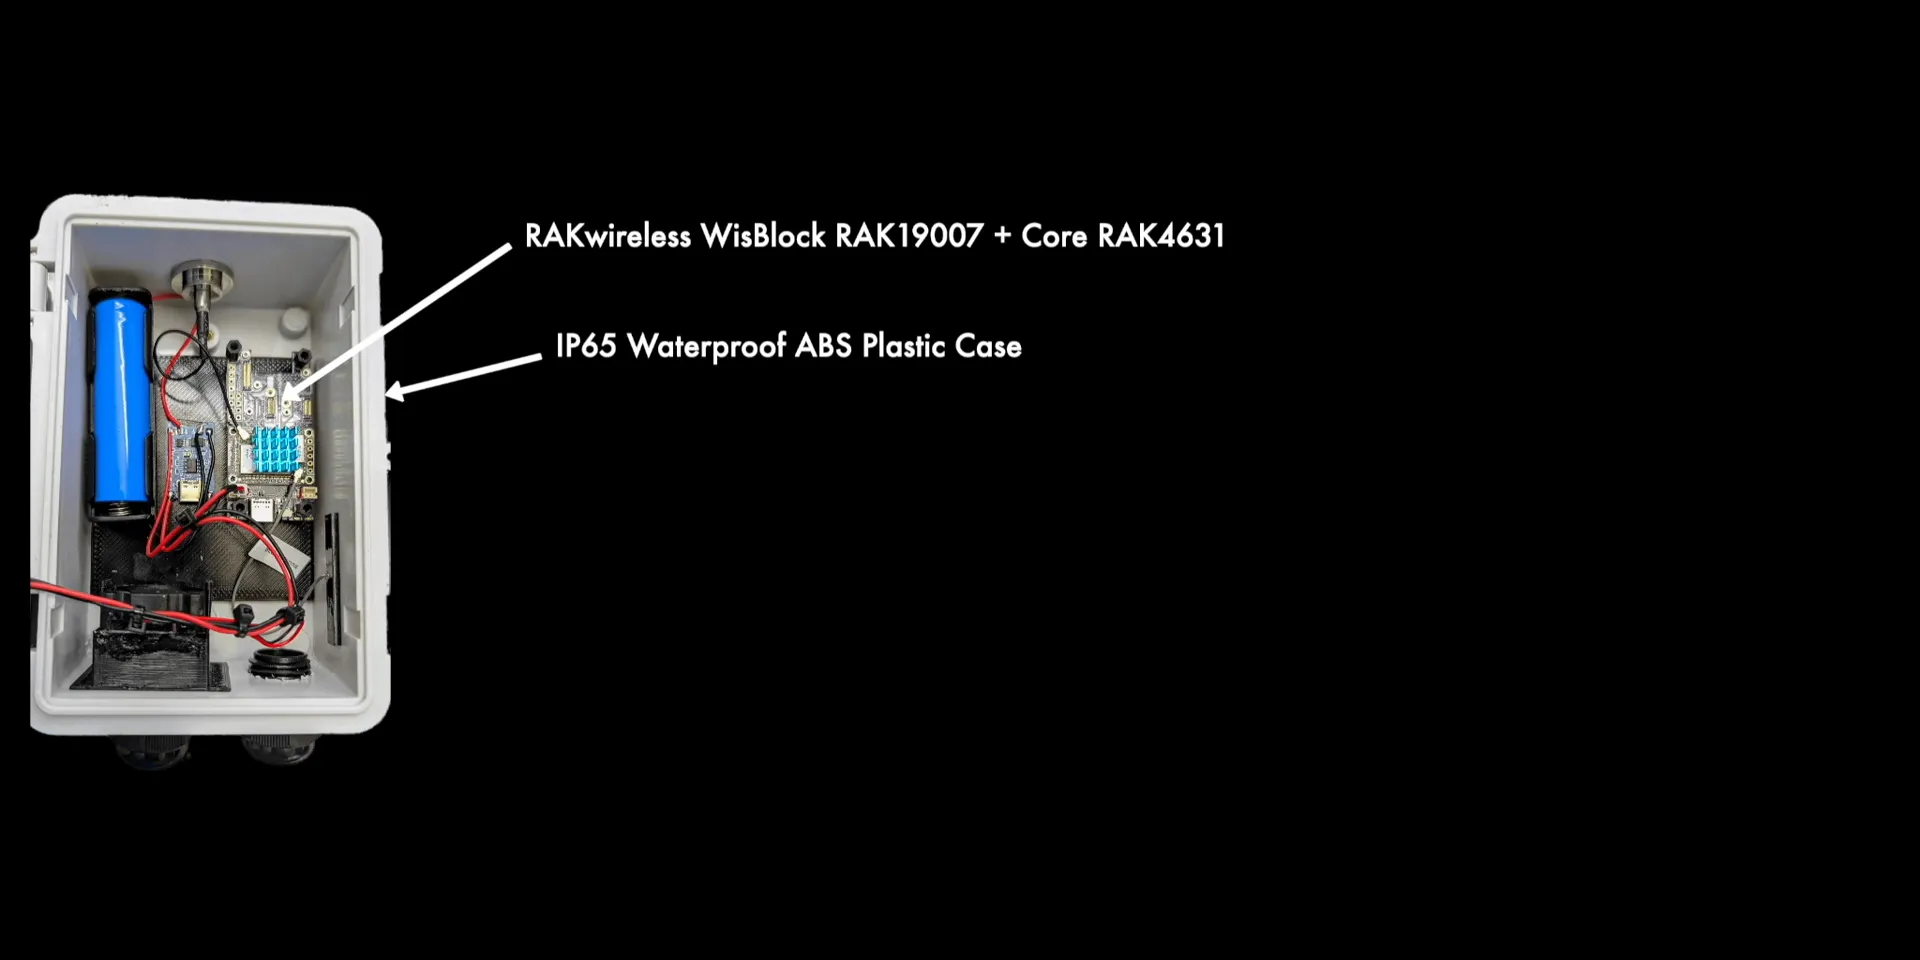
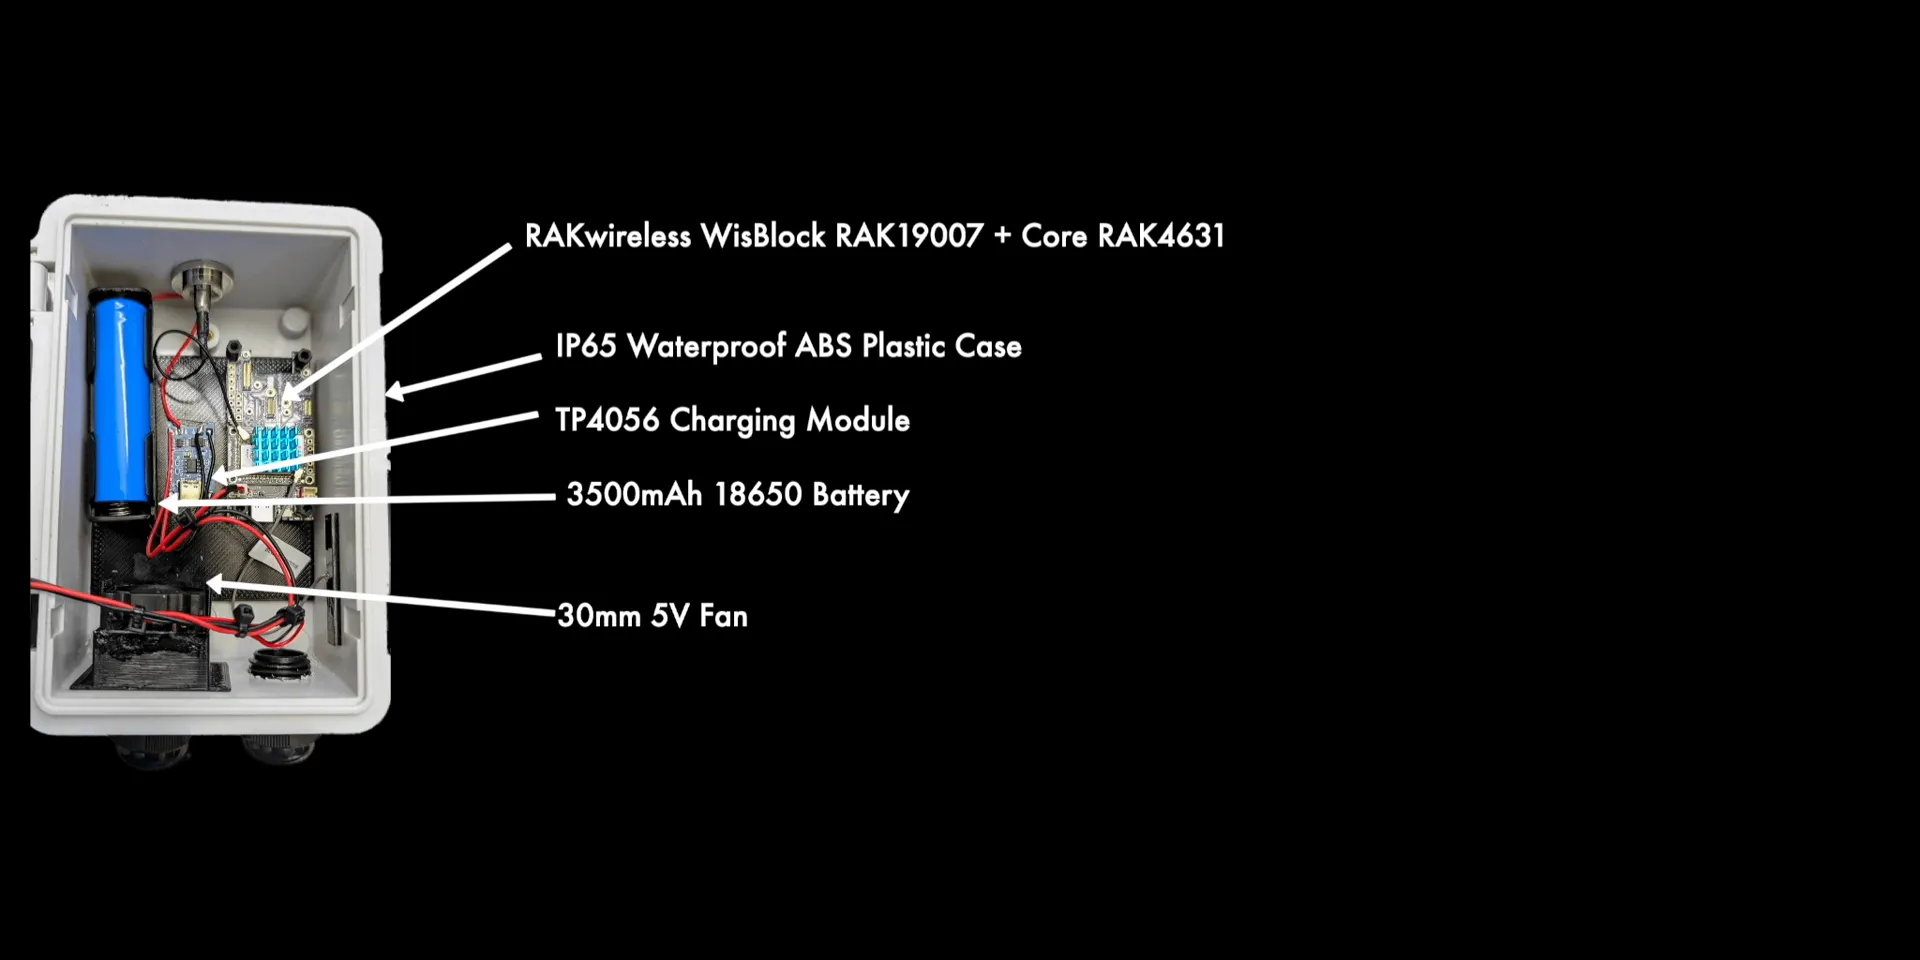
- RakWireless WisBlock (Full Version): The core LoRa module where the Meshtastic or Mesh Core software will run.
- Waterproof Case: A $9 rugged enclosure providing protection against weather, with two cable routing ports.
- MPPT Charge Controller: A TP4056-based module that manages solar charging separately from the WisBlock, increasing efficiency.
- 18650 Battery: The power storage unit, chosen for its capacity and compatibility.
- 5V 30mm Cooling Fan: Powered directly by one of the solar panels to maintain airflow and prevent overheating.
- Solar Panels: Two small panels for battery charging and a larger panel dedicated to powering the cooling fan.
- Type N Connector and 915 MHz Alfa Antenna: For robust LoRa communication with a waterproof seal.
- Custom 3D Printed Parts: Backplate mounts, a shade cover with air vents, feet to create an air gap, and fan mounts.
I’ll provide links to all these components and 3D print files on my site and in the project description for easy access.
Building the Solar Node: Step-by-Step
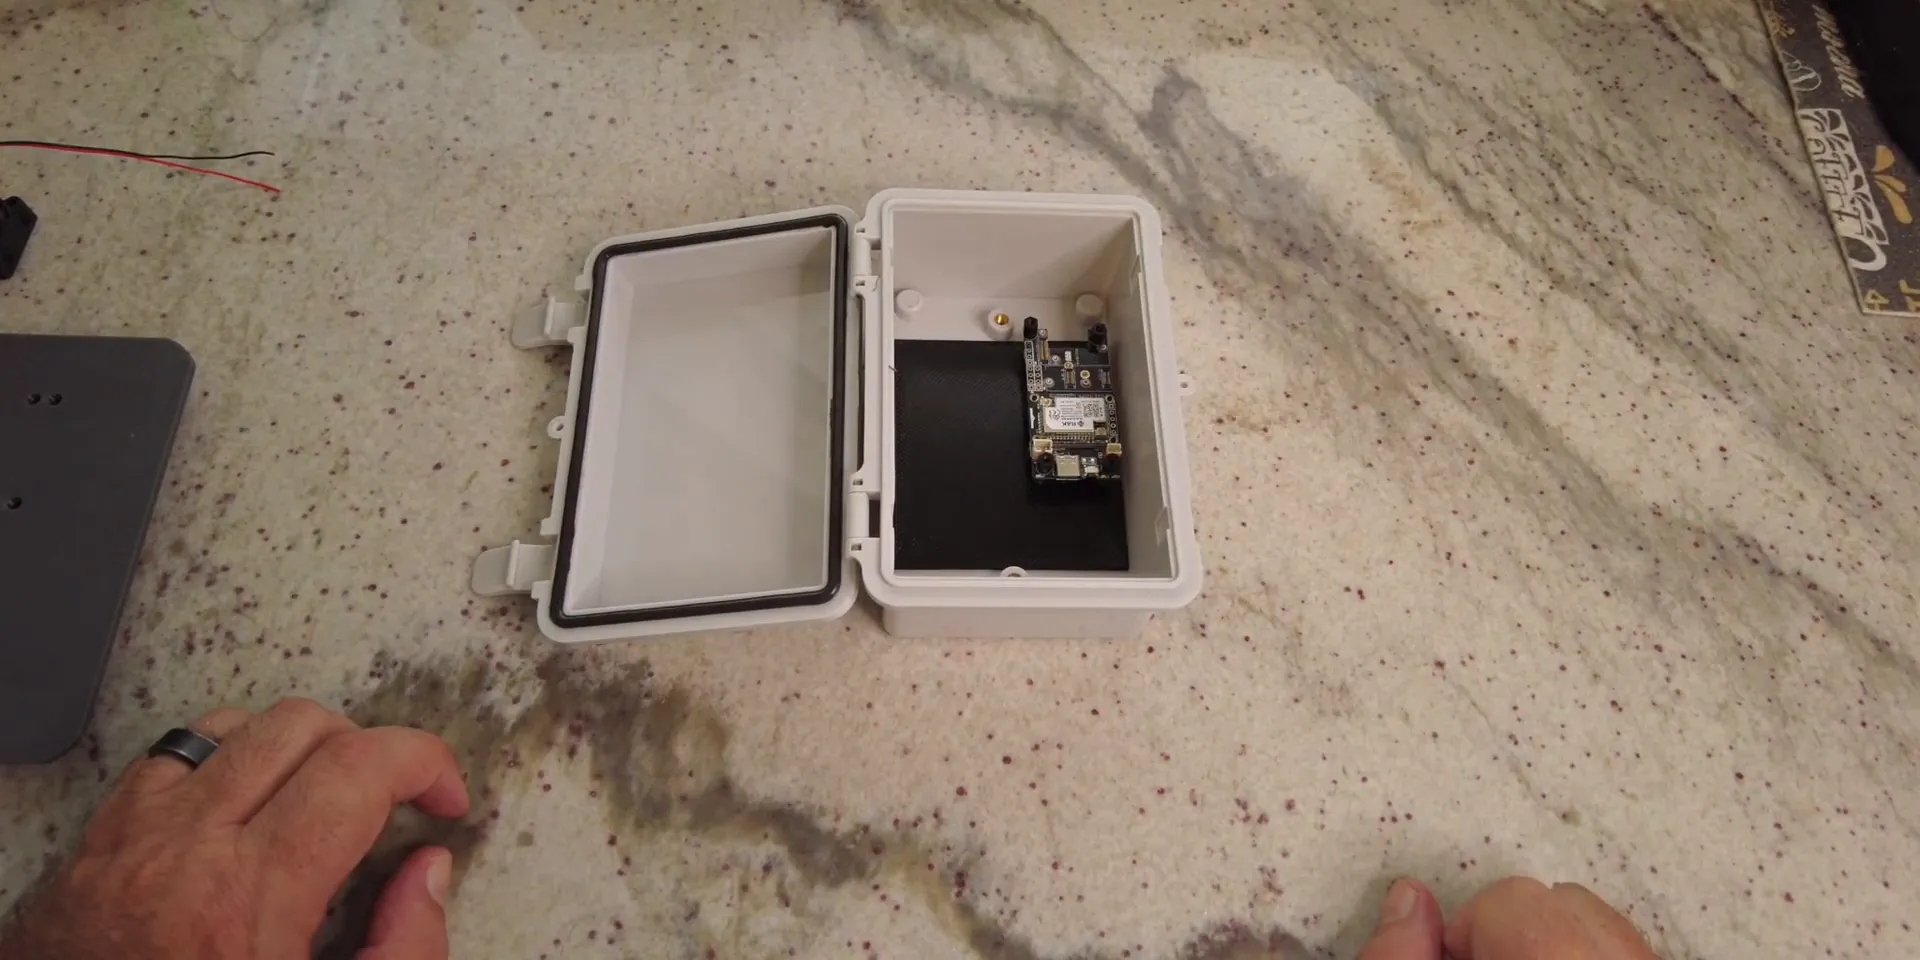
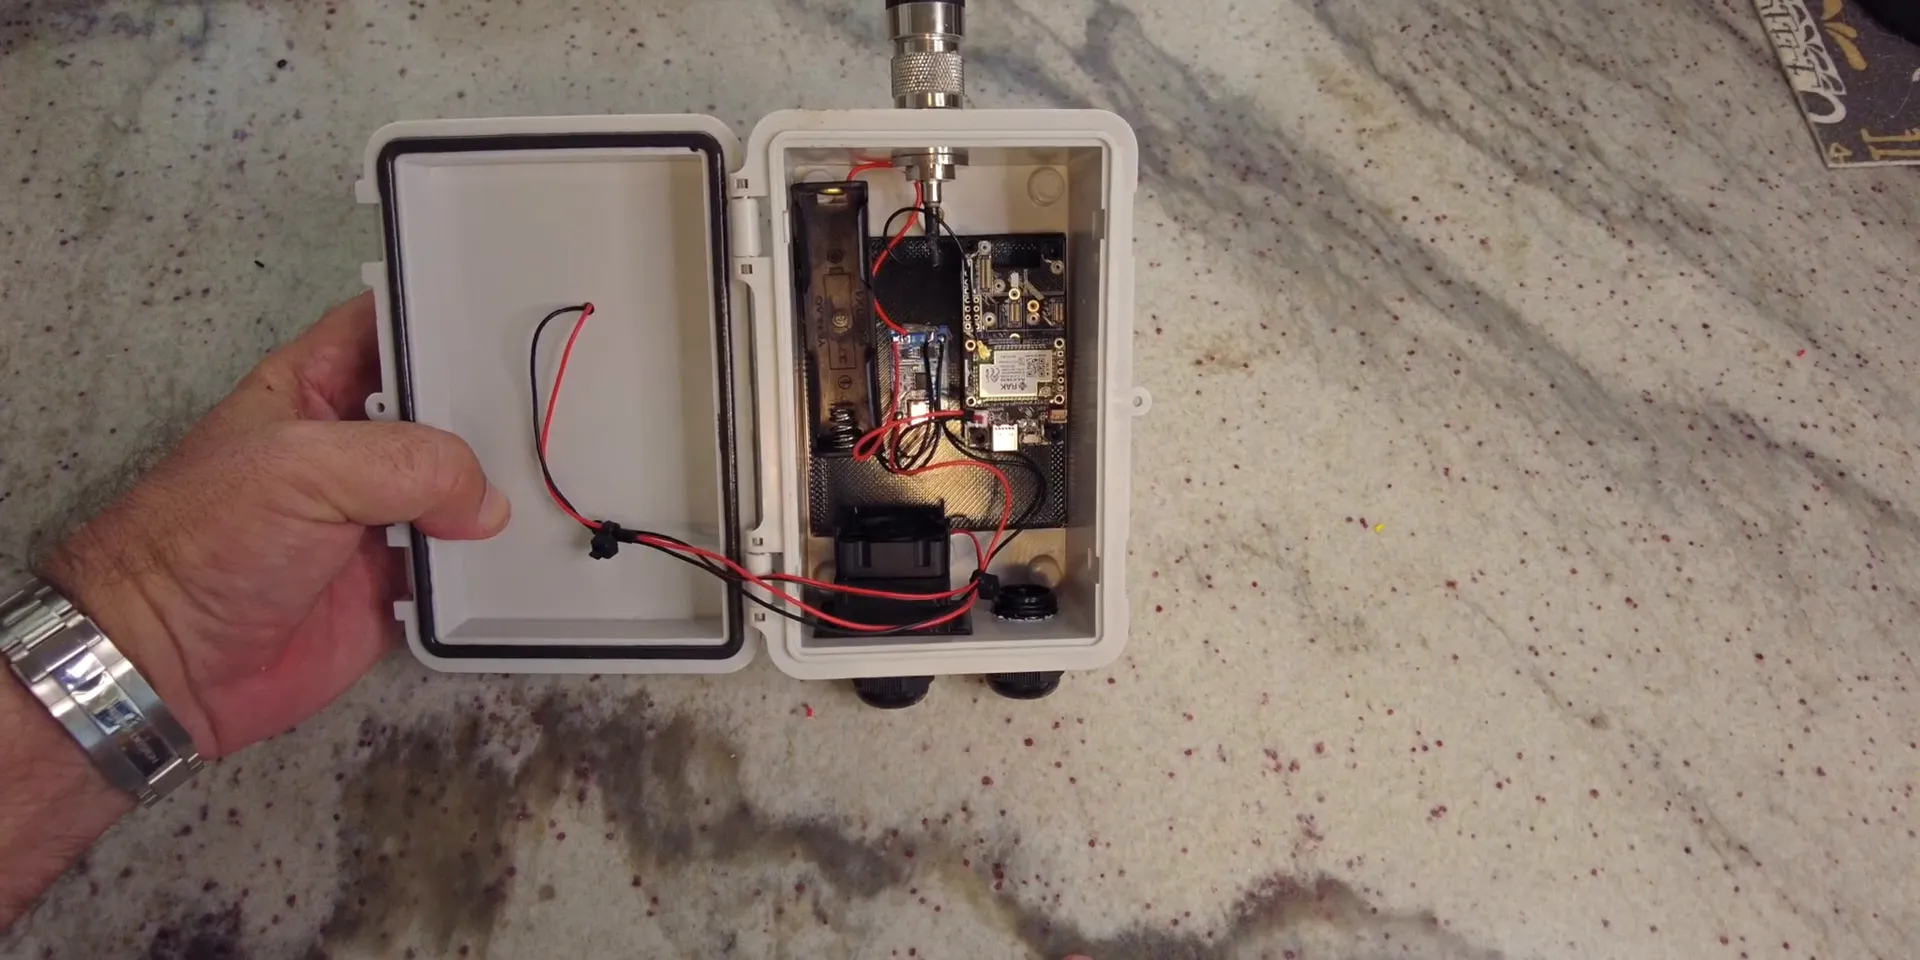
Mounting the Electronics
The WisBlock LoRa module fits securely onto a 3D-printed backplate with standoffs, which I’ve designed to fit perfectly inside the waterproof case. I also added a small heatsink on the WisBlock, mostly for fun but it helps with thermal management.
The MPPT charge controller sits alongside the battery, wired carefully to ensure proper polarity. The battery connects to the charge controller, and the controller’s output powers the WisBlock through a dedicated power plug. Always double-check positive and negative connections to avoid damage.
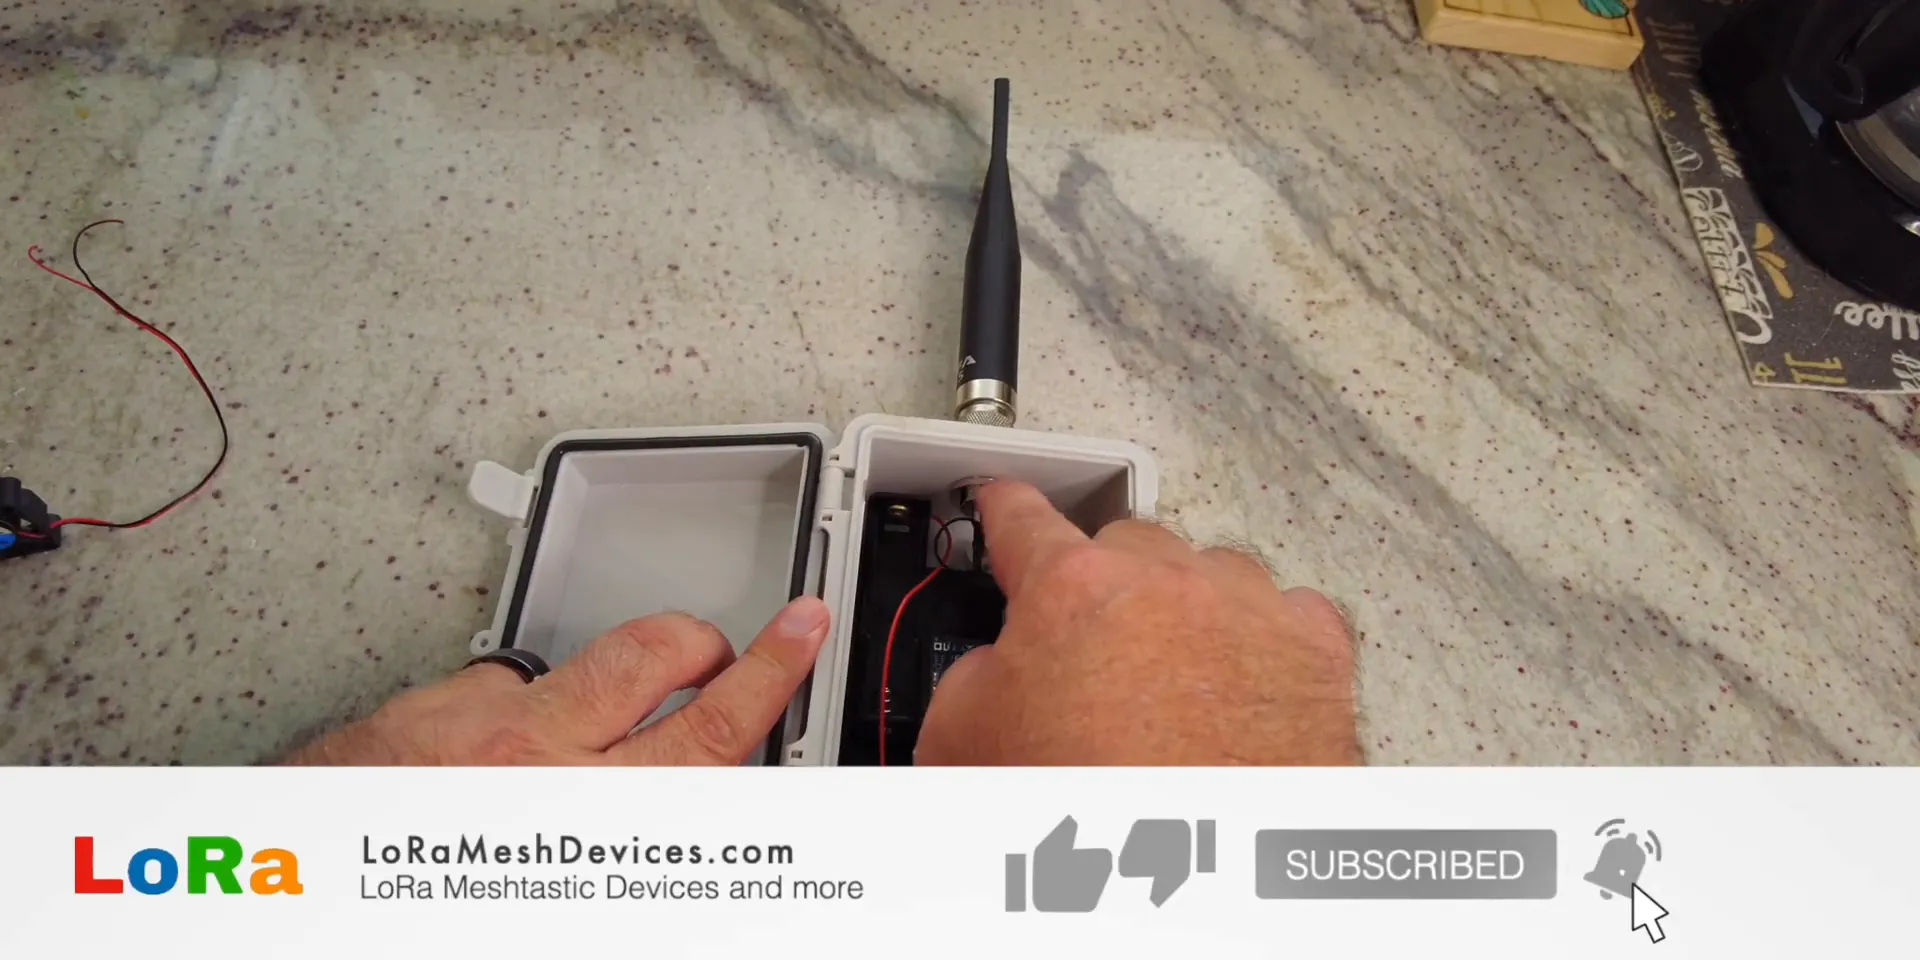
Integrating the Antenna and Sealing
For wireless communication, I used a 915 MHz Alfa antenna attached via a Type N connector with a rubber gasket to create a waterproof seal where the cable passes through the case. This setup prevents water ingress while maintaining strong signal integrity.
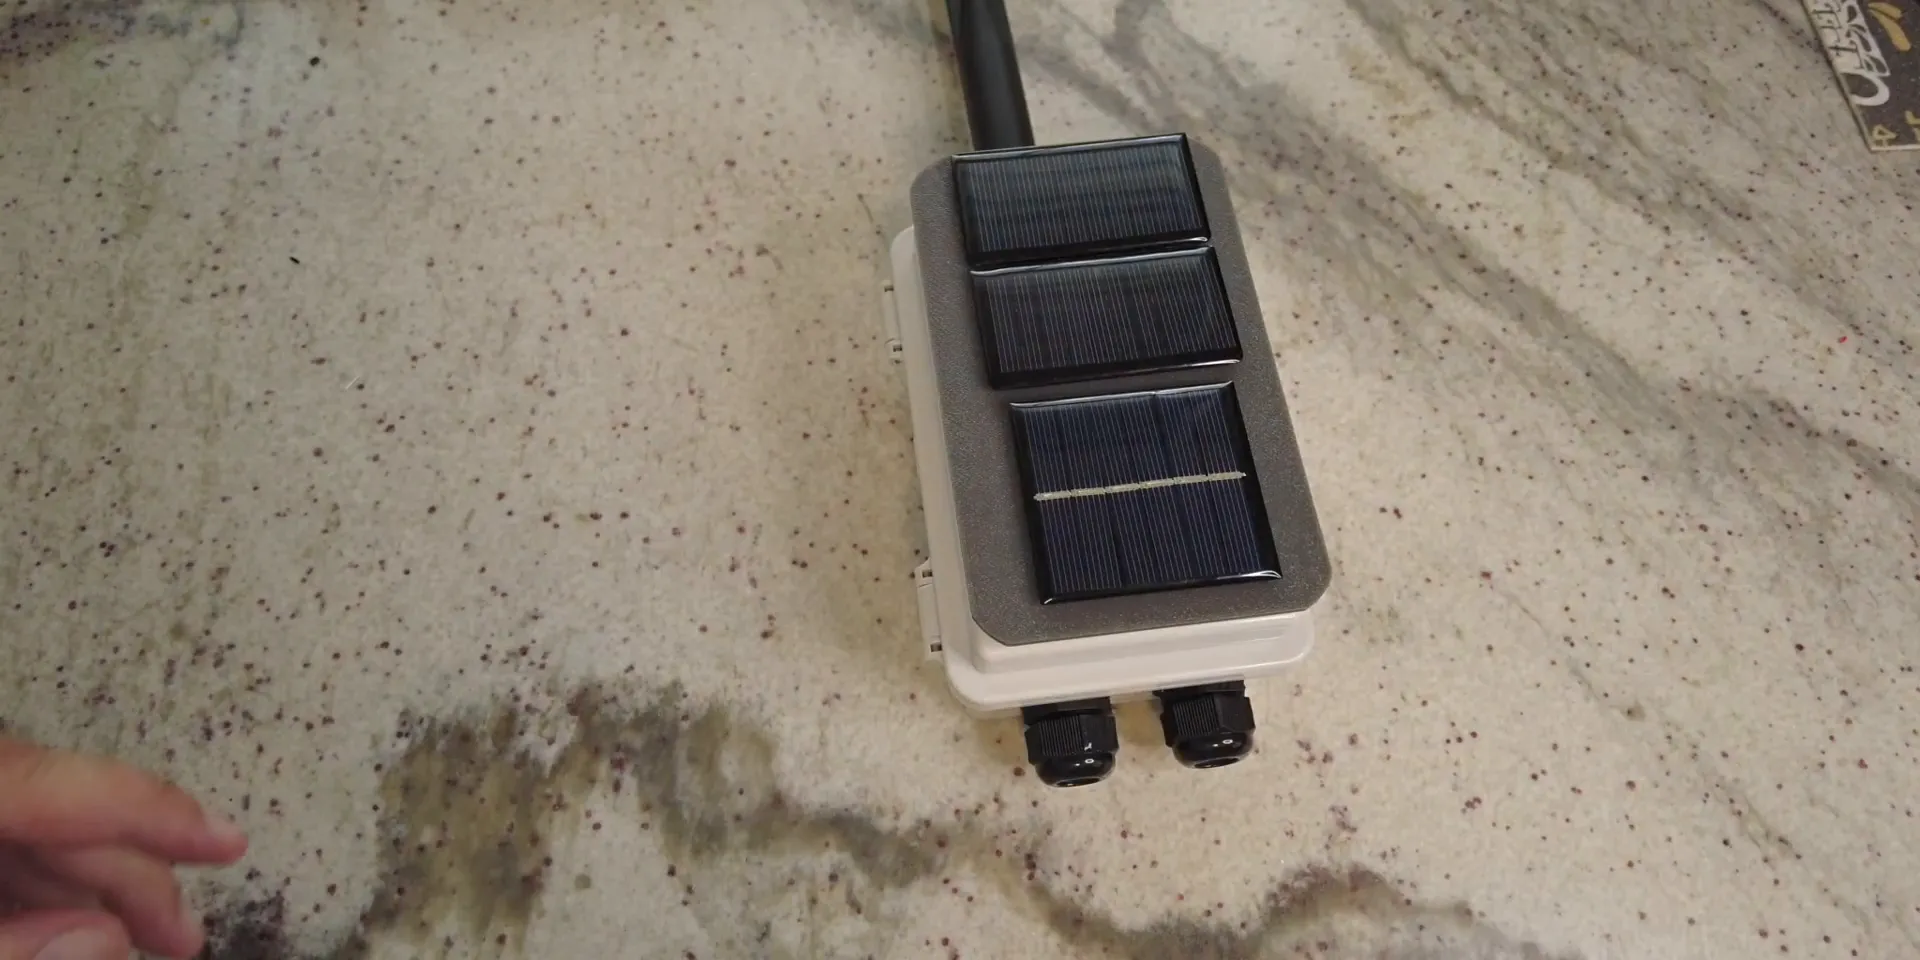
Innovative Cooling and Solar Panel Mounting
One standout feature of this build is the cooling system. Instead of mounting solar panels flat on the case (which causes the enclosure to heat up), I designed a 3D-printed shade cover that sits above the case, creating an air gap. This cover has built-in vents and feet that dissipate heat from the solar panels without transferring it directly to the case.
The solar panels mount on top of this shade, absorbing sunlight to charge the battery via the MPPT controller and power a fan inside the case. The fan is wired directly to the larger solar panel, so it spins only when there’s sufficient sunlight, providing natural, energy-efficient cooling.

Airflow Design
The case includes two cable routing ports positioned at the bottom. One serves as an air intake, while the other acts as an exhaust outlet. The fan pulls cool air in from one side and pushes warm air out the other, maintaining a constant airflow to keep the electronics cool. This airflow design prevents overheating, which is a common challenge in solar-powered enclosures exposed to direct sunlight.
Assembly and Final Connection
After mounting all components and sealing the cable holes with silicone to keep moisture out, the build is ready for testing. The antenna is securely connected, the battery is installed, and the solar panels are wired to the charge controller and fan.
Testing the Meshtastic Solar Node
Once the node is exposed to sunlight, the MPPT charge controller kicks in, powering up the WisBlock. You can see the green LED illuminate, indicating it’s operational. Simultaneously, the fan starts spinning, driven by the solar panel, providing active cooling as the node charges and operates.
This demonstrates the node’s ability to run completely independently, charging its own battery, regulating temperature, and maintaining reliable wireless communication capabilities.
Summary and Next Steps
In this project, we built a fully standalone Meshtastic Solar Node that combines efficient solar charging, smart cooling, and weatherproof protection. Key highlights include:
- An external MPPT charge controller for optimized battery charging
- A novel 3D-printed solar panel shade with an air gap to reduce case heating
- A solar-powered fan that provides active cooling only when needed
- Waterproof antenna connector and sealed cable routing to protect internal electronics
- Compact and modular design suitable for outdoor deployment
The next step is to load Meshtastic or Mesh Core software onto the WisBlock, enabling the node to join mesh networks for IoT or communication purposes. I’ll cover the software setup in a follow-up guide.
You can mount this unit on a pole or attach it to a building using cable ties or mounting pads. The design offers flexibility and durability for a variety of use cases.
Frequently Asked Questions (FAQ)
What is the purpose of the MPPT charge controller?
The MPPT (Maximum Power Point Tracking) charge controller optimizes the charging of the battery from the solar panels, ensuring efficient energy harvesting even in varying sunlight conditions.
Why use a cooling fan inside the solar node?
The fan circulates air to prevent overheating of the electronics caused by direct sunlight and heat build-up inside the enclosure, thus improving reliability and longevity.
How does the 3D-printed shade help with heat management?
The shade creates an air gap between the solar panels and the case, allowing heat to dissipate through vents and feet without heating the enclosure directly, keeping internal temperatures lower.
Can I use this design with other LoRa modules?
Yes, while this build uses the RakWireless WisBlock, the enclosure and cooling system can be adapted to fit other compatible LoRa modules with similar dimensions.
Is the solar node waterproof?
The case and cable routing ports are sealed with silicone and use waterproof connectors, making the enclosure resistant to rain and moisture when properly assembled.
Where can I find the 3D print files and component links?
All component purchase links and 3D print files will be made available on my website and project description to help you replicate this build.
This Meshtastic Solar Node project is a great way to explore LoRa mesh networking with a self-sustaining, weatherproof device that can operate autonomously outdoors. I hope you find this guide useful and inspiring for your own IoT adventures!