
ESP32 C6 + Meshtastic: Send Messages!
Published by Vivian van Zyl in Meshtastic the 01/29/2025 at 03:45 am

In the world of wireless communication and IoT, the integration of Meshtastic with the ESP32 C6 microcontroller offers a powerful combination for seamless messaging. This guide will take you through the setup process, from connecting devices to coding adjustments, to unleash the full potential of this integration. Whether you're a tech enthusiast or a seasoned developer, this journey offers something valuable for everyone.
Table of Contents
- Getting Started with ESP32 C6 and Meshtastic
- Creating an API Server on ESP32 C6
- Soldering and Connecting the Components
- Testing the Setup
- Advanced Configurations and Applications
- FAQ
Getting Started with ESP32 C6 and Meshtastic
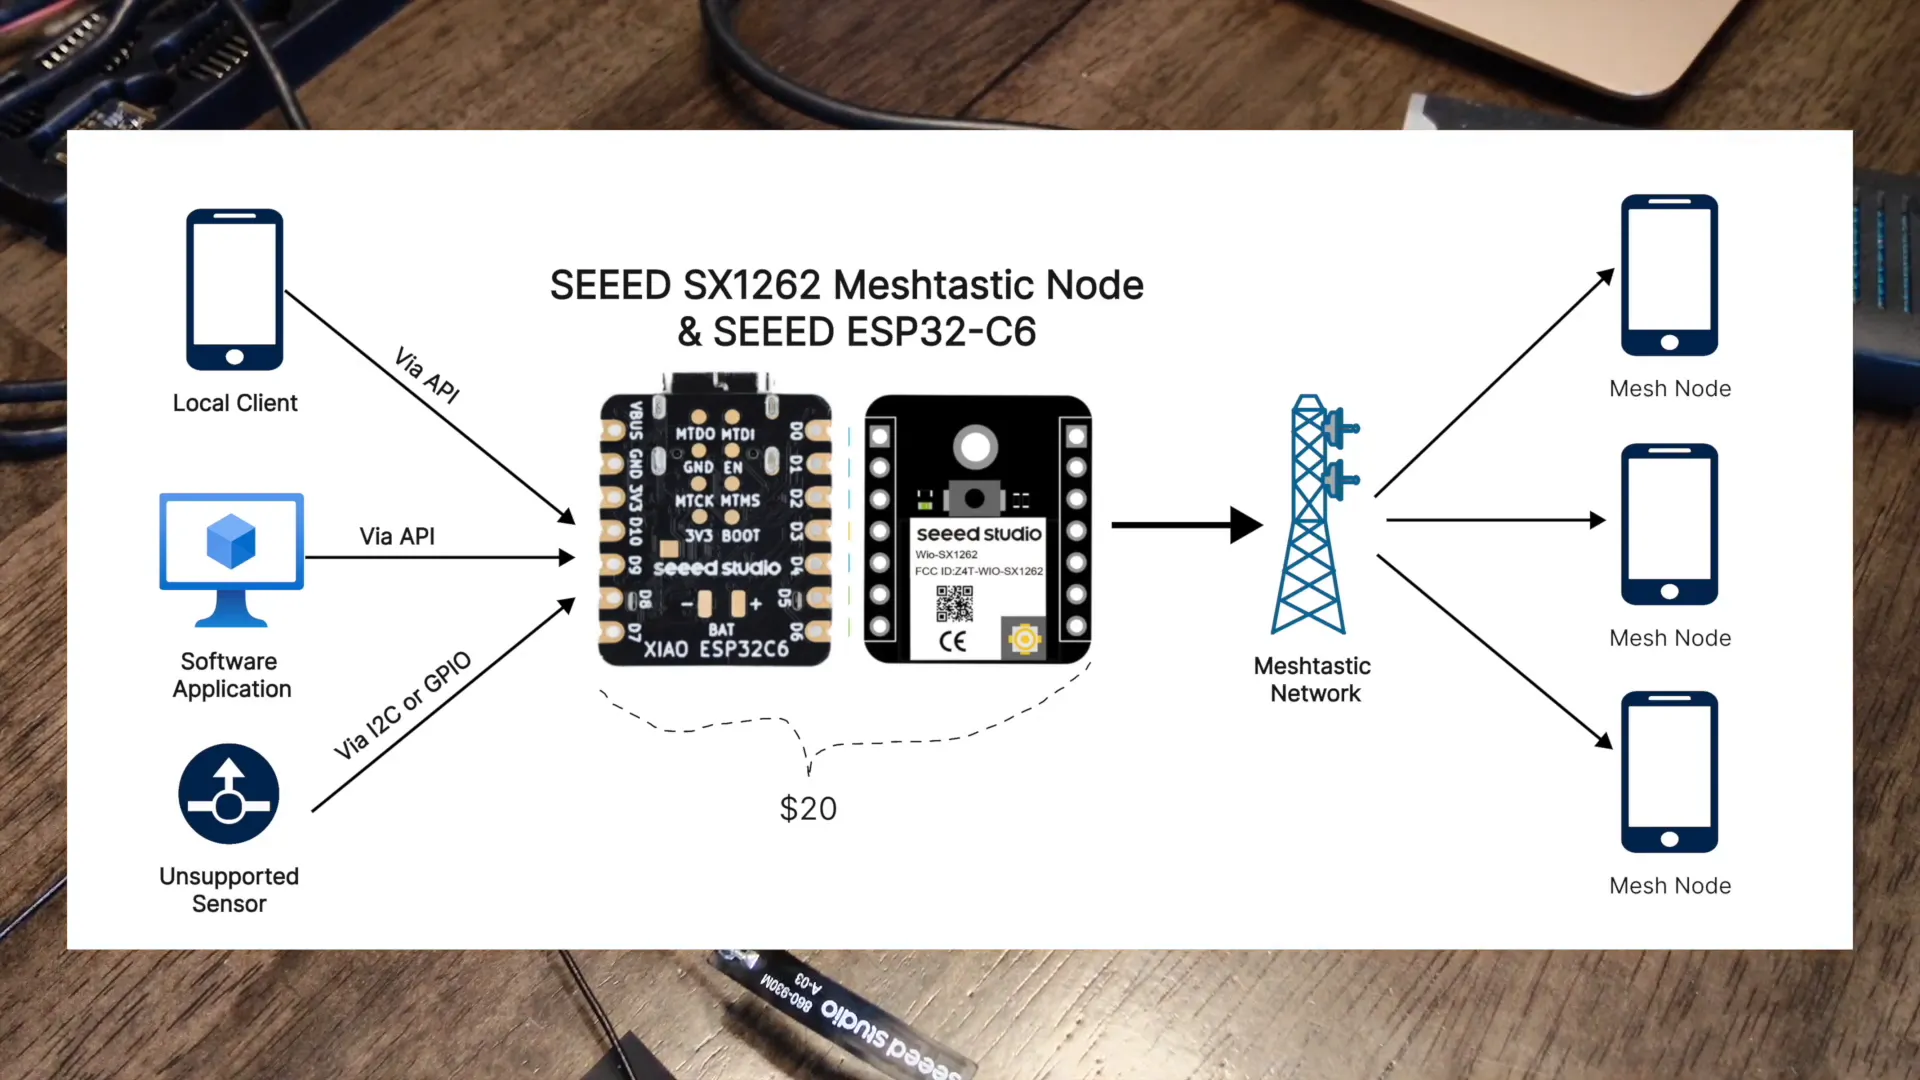
Before diving into the technicalities, let's understand the hardware we're dealing with. The ESP32 C6 from Seed Studios is a robust microcontroller designed for a variety of applications. Paired with a Meshtastic node, specifically the SX1262 from Seed Studio, it sets the stage for innovative communication solutions.
In the initial stages of this project, we connected an LED to the ESP32 C6 microcontroller. This simple setup allowed us to control the LED, turning it on and off, and even flashing it. The next step involved updating the Circuit Python application to transform the microcontroller into an API server.

Creating an API Server on ESP32 C6
Transforming the ESP32 C6 into an API server opened new possibilities. By hitting specific endpoints, we could control the LED remotely. The application was further modified to provide status updates through LED flashes. Fast flashes indicated successful Wi-Fi connection, while quick flashes alerted us of connection issues.
The real magic began when we connected the ESP32 C6 to the Meshtastic node. This setup enabled message transmission over Meshtastic, using TxRx pins. Proper pin configuration is crucial for seamless communication, and we ensured that TX connected to RX and vice versa.
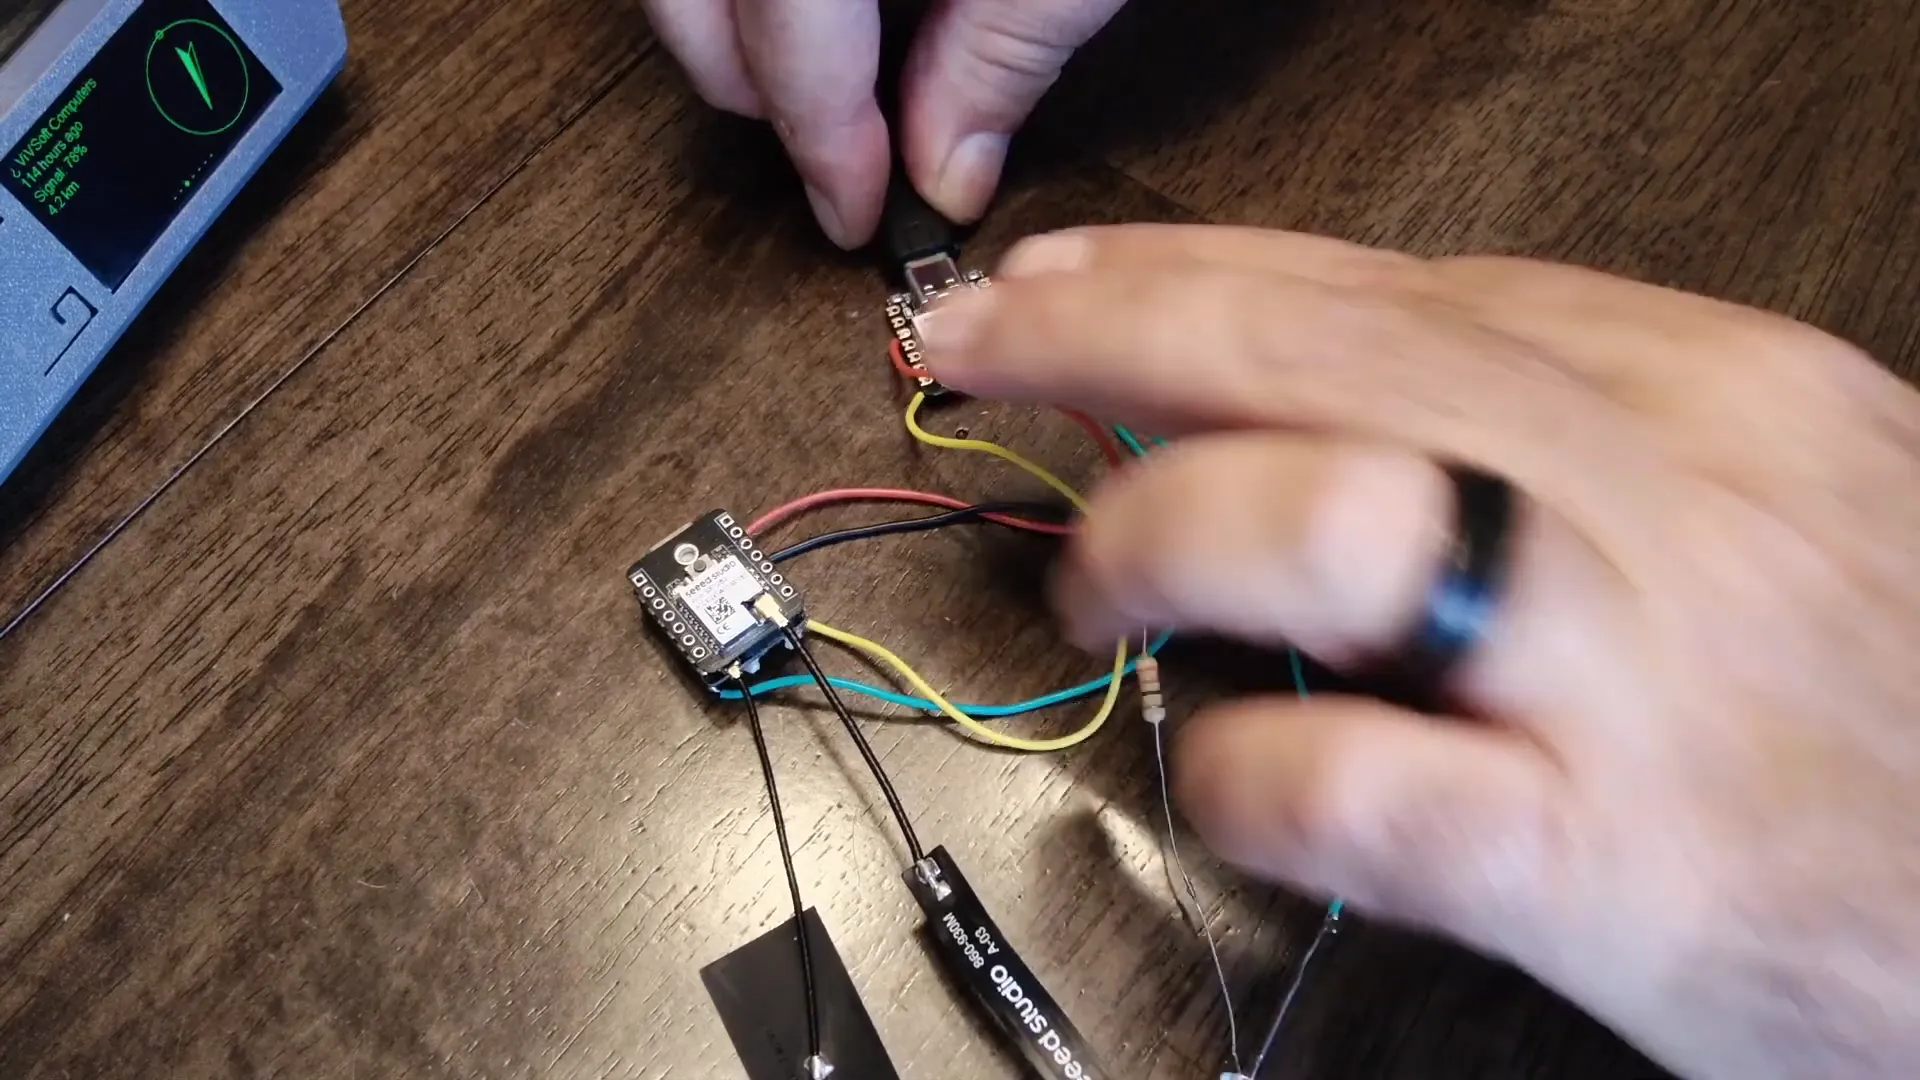
Soldering and Connecting the Components
Soldering might not be everyone's favorite task, but it's an essential skill in this project. Carefully connecting the ESP32 C6 to the Meshtastic node via serial RXTX and power connections is vital. Once connected, powering either device will power the other, thanks to the shared power bus.
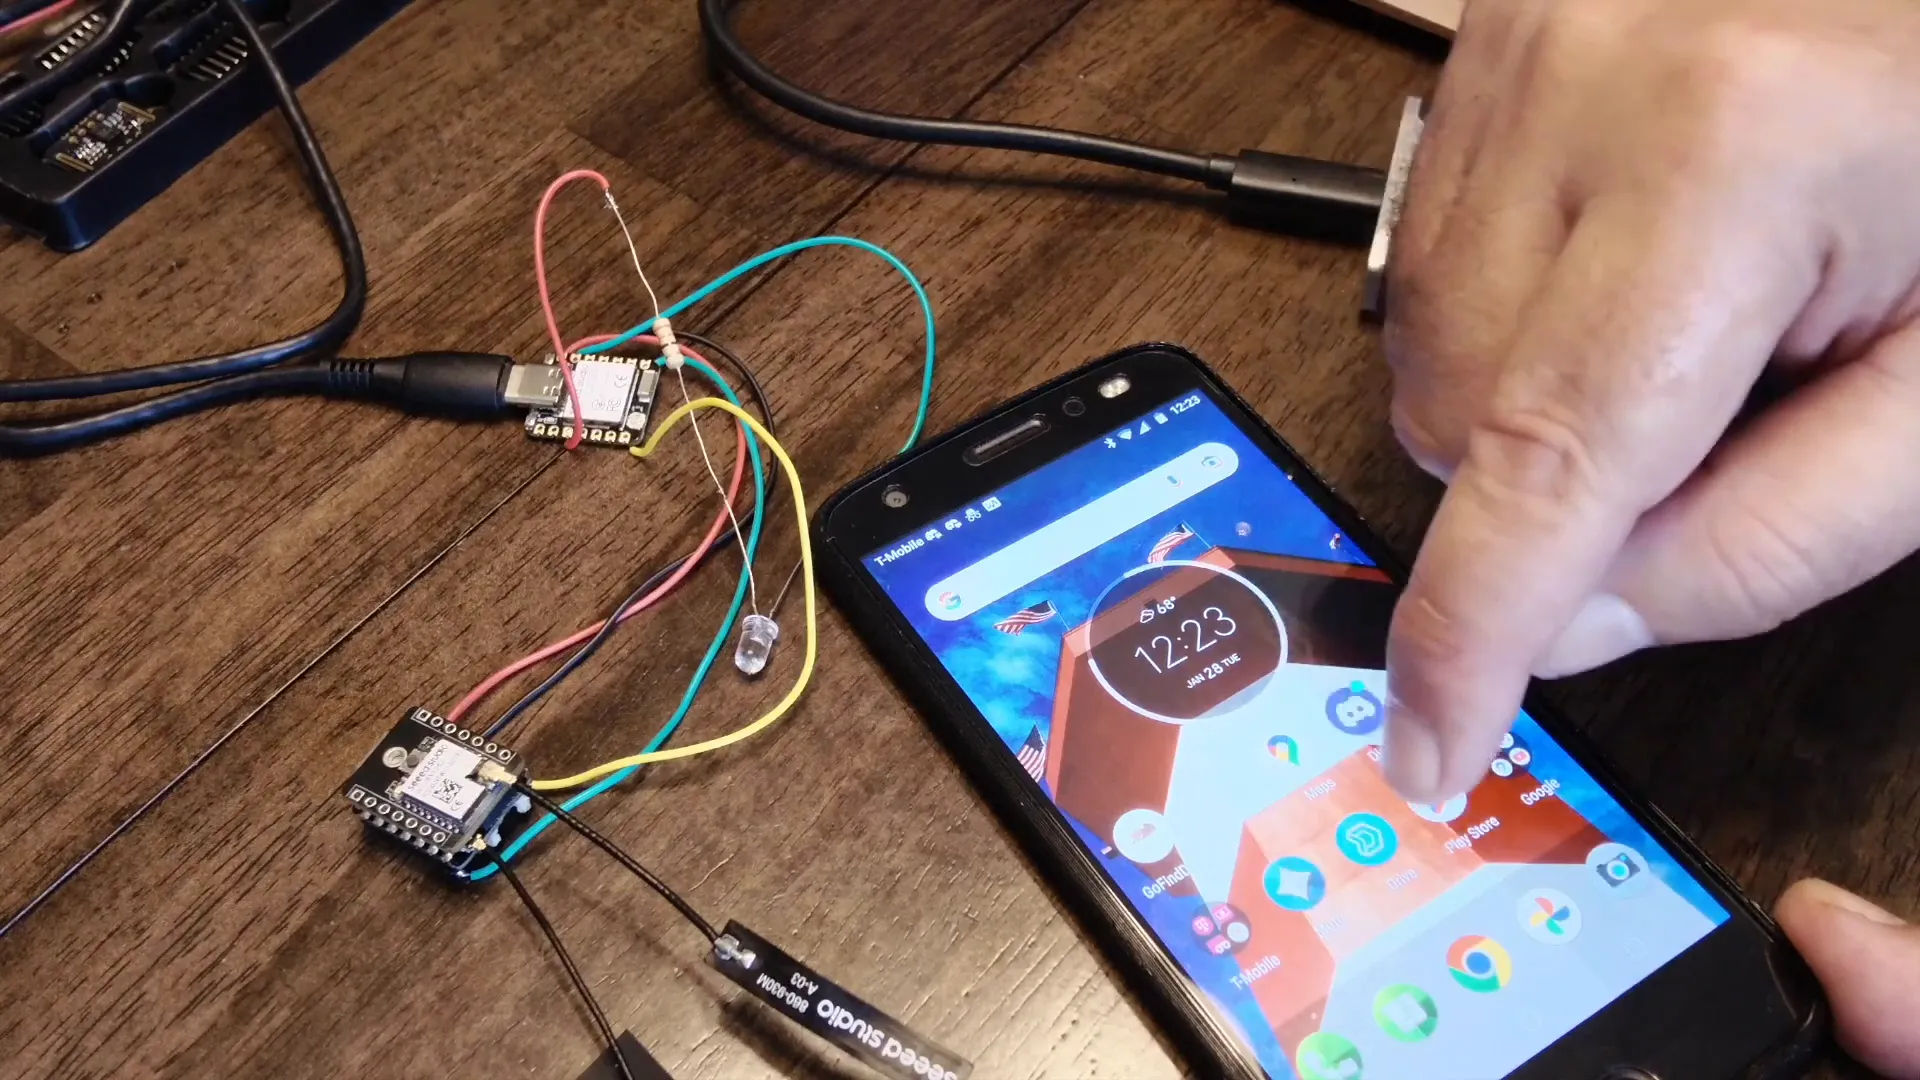
Testing the Setup
With the hardware connected, it was time to test the setup. Upon powering the devices, the LED flashed, confirming successful Wi-Fi connection. Using a smartphone, we accessed the API server and controlled the LED remotely by sending commands to turn it on and off.
The integration of Meshtastic introduced a new endpoint for sending messages. By sending a message through the API, we could observe the message being relayed to the Meshtastic node, showcasing the seamless communication between devices.
Advanced Configurations and Applications
Beyond basic messaging, the integration opens doors to advanced configurations. By enabling serial communication and setting appropriate pin configurations, we ensured compatibility between the ESP32 C6 and the Meshtastic node. The node was configured to send any received serial messages to a default channel.
This setup is not just limited to messaging. By integrating additional sensors, such as a Lux sensor, we can automate message sending based on specific conditions. This flexibility allows for endless possibilities in IoT applications, making the ESP32 C6 and Meshtastic integration a powerful tool for developers.
The CircuitPython Code
import socketpool
import wifi
import board
import digitalio
import os
import time
import busio
# Connect to WiFi
network_name = os.getenv("SID_VS")
network_password = os.getenv("PAS_VS")
# Set up LED
led = digitalio.DigitalInOut(board.D2)
led.direction = digitalio.Direction.OUTPUT
def flash_led(times, interval):
"""Function to flash the LED a given number of times with a specified interval."""
for _ in range(times):
led.value = True
time.sleep(interval)
led.value = False
time.sleep(interval)
print("Connecting to WiFi...")
try:
wifi.radio.connect(network_name, network_password)
device_ip = wifi.radio.ipv4_address
print("Connected to WiFi with IP:", device_ip)
# Flash LED 3 times, once per second, for successful connection
flash_led(3, 1)
except Exception as e:
print("Failed to connect to WiFi:", e)
# Flash LED 5 times, 0.2 second intervals, for failed connection
flash_led(5, 0.2)
# Prepare socket only if WiFi connection is successful
if wifi.radio.ipv4_address:
pool = socketpool.SocketPool(wifi.radio)
server_socket = pool.socket(pool.AF_INET, pool.SOCK_STREAM)
server_socket.bind((str(device_ip), os.getenv("PORT")))
server_socket.listen(1)
print("Listening for connections on port", os.getenv("PORT"))
def receive_request(connection):
buffer = bytearray(1024)
request = ""
while True:
try:
num_bytes = connection.recv_into(buffer)
if num_bytes == 0:
break
request += buffer[:num_bytes].decode('utf-8')
except OSError as e:
break
return request
def respond(connection, response):
response_text = (
"HTTP/1.1 200 OK\r\n"
"Content-Type: text/html\r\n"
"Connection: close\r\n"
"\r\n" + response
)
connection.send(response_text.encode('utf-8'))
connection.close()
# Initialize UART for serial communication
uart = busio.UART(board.TX, board.RX, baudrate=9600)
while True:
print("Waiting for a connection...")
connection, address = server_socket.accept()
print(f"Connection from {address}")
try:
# Read the request using recv_into
request = receive_request(connection)
print("Request:", request)
if "GET /led/on" in request:
led.value = True
print("LED turned on")
respond(connection, "
LED is now ON
")elif "GET /led/off" in request:
led.value = False
print("LED turned off")
respond(connection, "
LED is now OFF
")elif "GET /sendmessage" in request:
# Extract message parameter from URL
try:
start_index = request.index("message=") + len("message=")
end_index = request.index(" ", start_index)
message = request[start_index:end_index]
message = message.replace("%20", " ") # To handle spaces in URL encoded
uart.write((message + "\n").encode('utf-8')) # Write message to serial
print(f"Message sent: {message}")
respond(connection, "
Message Sent
")except ValueError:
respond(connection, "
Missing 'message' parameter
")else:
respond(connection, "
Welcome! Use /led/on, /led/off, or /sendmessage
")finally:
connection.close()
FAQ
What is Meshtastic?
Meshtastic is a mesh communication protocol that allows devices to communicate with each other without relying on traditional internet infrastructure. It's particularly useful for remote areas and IoT applications.
Can I use other sensors with this setup?
Yes, you can integrate additional sensors that Meshtastic doesn't support by default. This is achieved by connecting them to the ESP32 C6 and using the API server to relay messages based on sensor data.
Where can I purchase the necessary components?
You can find the XIAO ESP32C6 3PCS Pack and other components like the Electronics Component Fun Kit and Soldering Iron Kit on lorameshdevices.com.
Is soldering necessary for this project?
Yes, soldering is required to connect the ESP32 C6 to the Meshtastic node. Proper connections ensure reliable communication and power sharing between the devices.
In conclusion, the ESP32 C6 and Meshtastic integration offers a versatile platform for wireless communication and IoT projects. By following this guide, you can harness the power of this combination to create innovative solutions tailored to your needs. Whether you're sending messages or integrating sensors, the possibilities are endless. Happy tinkering!