
Meshtastic, Remote Management: Complete Setup Guide
Published by Vivian van Zyl in Meshtastic the 04/21/2026 at 04:38 pm

Meshtastic, Remote Management is one of those features that becomes incredibly useful the moment you put a node somewhere awkward, high up, sealed in an enclosure, or simply out of easy reach. If you have ever mounted a node in a tree and then realized you want to change a setting, turn Bluetooth off, or check battery status, remote management solves that problem nicely.
The basic idea is simple. Your phone talks to an admin node over Bluetooth, and that admin node talks to your target node over LoRa. Once it is configured correctly, you can manage that remote node without connecting to it directly.
It sounds complicated when you first hear it, especially because one admin node can manage several nodes, but the setup is actually straightforward once you know the sequence.
Table of Contents
- How Meshtastic remote management works
- Step 1: Copy the public key from your admin node
- Step 2: Add that public key to the remote node’s admin keys
- Step 3: Reconnect to the admin node
- Step 4: Reboot the remote node so it publishes itself
- Step 5: Exchange metadata, then open remote management
- What you can do once remote management is active
- Checking device metrics remotely
- What you can monitor after telemetry is enabled
- Why this matters for real deployments
- Quick Meshtastic remote management setup checklist
- Common gotchas to remember
- FAQ
- Useful links
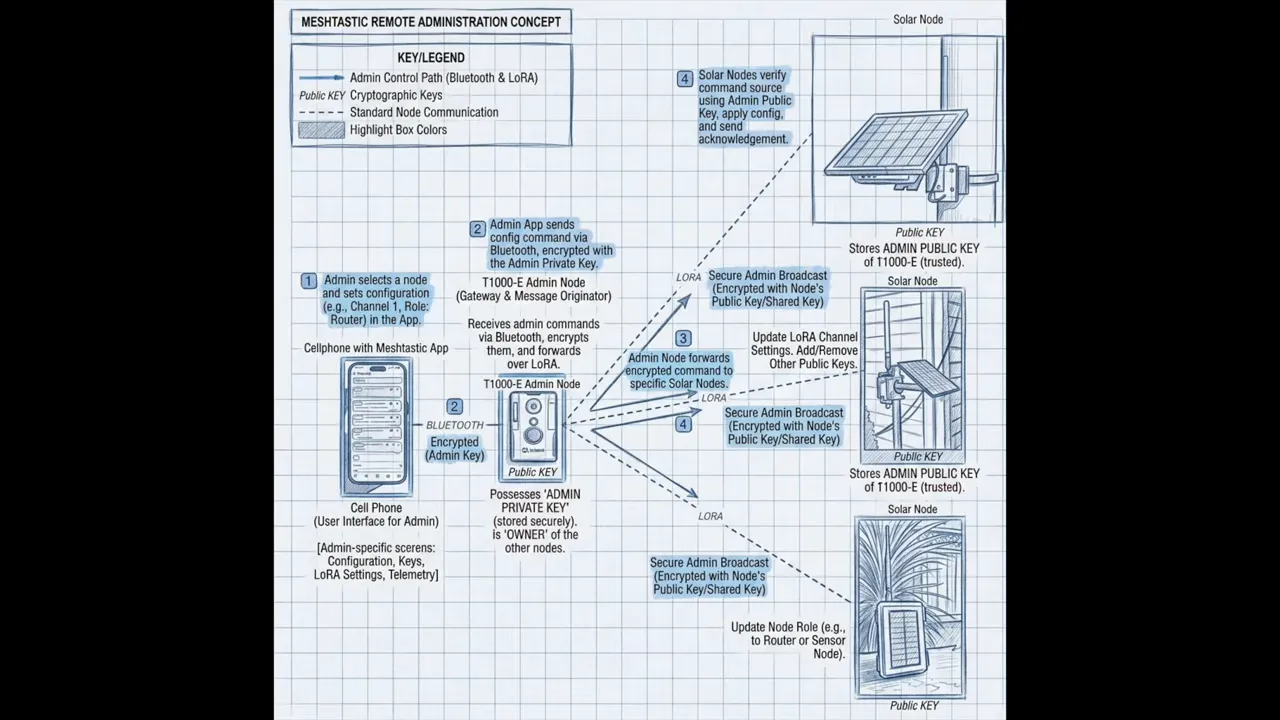
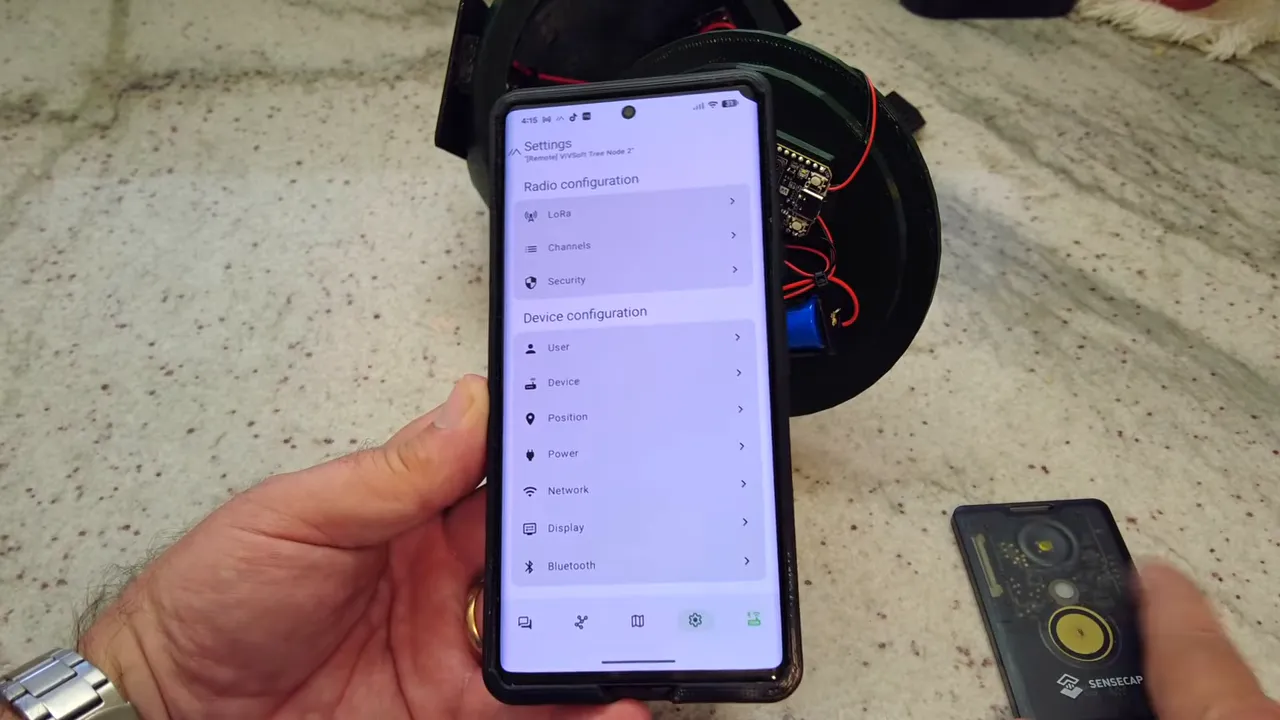
How Meshtastic remote management works
At a high level, there are three parts involved:
- Your phone running the Meshtastic app
- An admin node connected to the phone over Bluetooth
- A remote node that will be managed over LoRa
In this setup, the admin node is a SenseCAP T1000E, and the remote node is a Heltec V4. The same approach applies more broadly, but those are the devices used here.
The key to Meshtastic, Remote Management is the admin node’s public key. You copy that public key from the admin node and add it to the remote node’s security settings as an admin key. Once that trust relationship is in place, the remote node can be managed over the mesh.
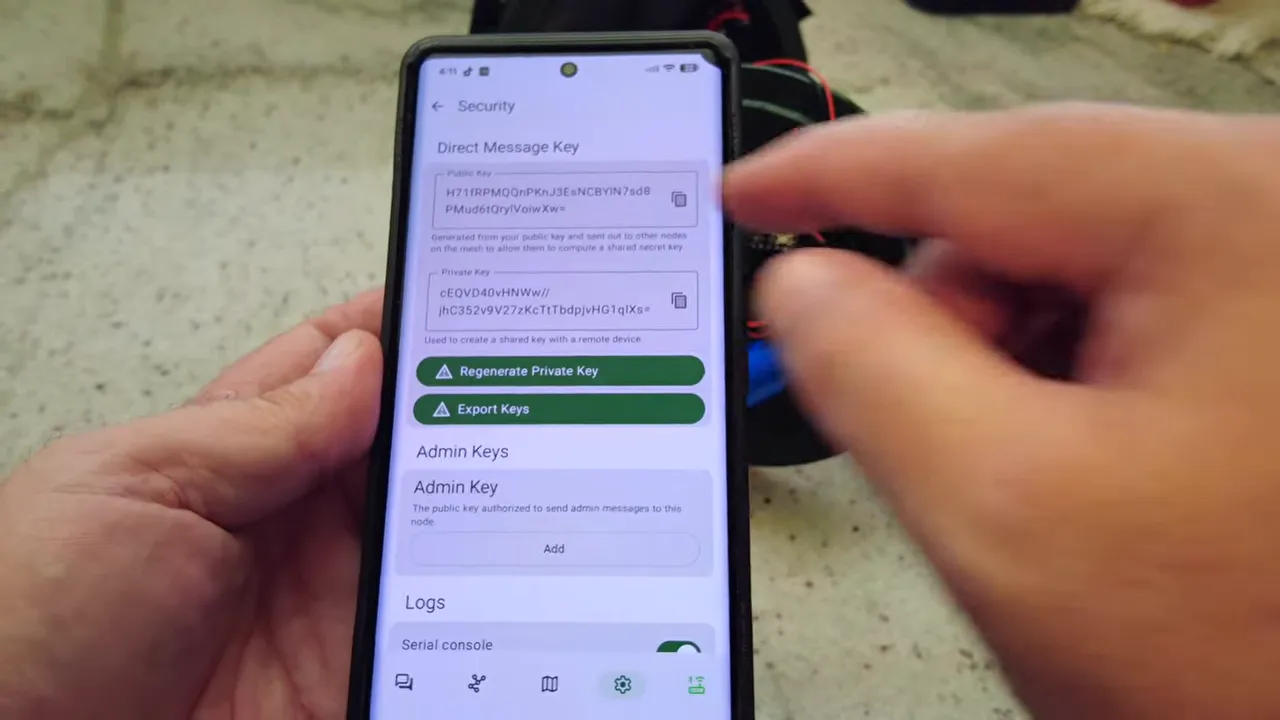
Step 1: Copy the public key from your admin node
Start by connecting the app to the node you want to use as your admin node. In this example, that is the SenseCAP T1000E.
Before turning Bluetooth off or changing anything else, go into the node settings and open Security. There you will find the node’s public key.
Copy that public key. This is the value you will paste into the remote node in the next step.
This step matters because remote management is not just a toggle you switch on. The remote node needs to know which admin node is allowed to control it.
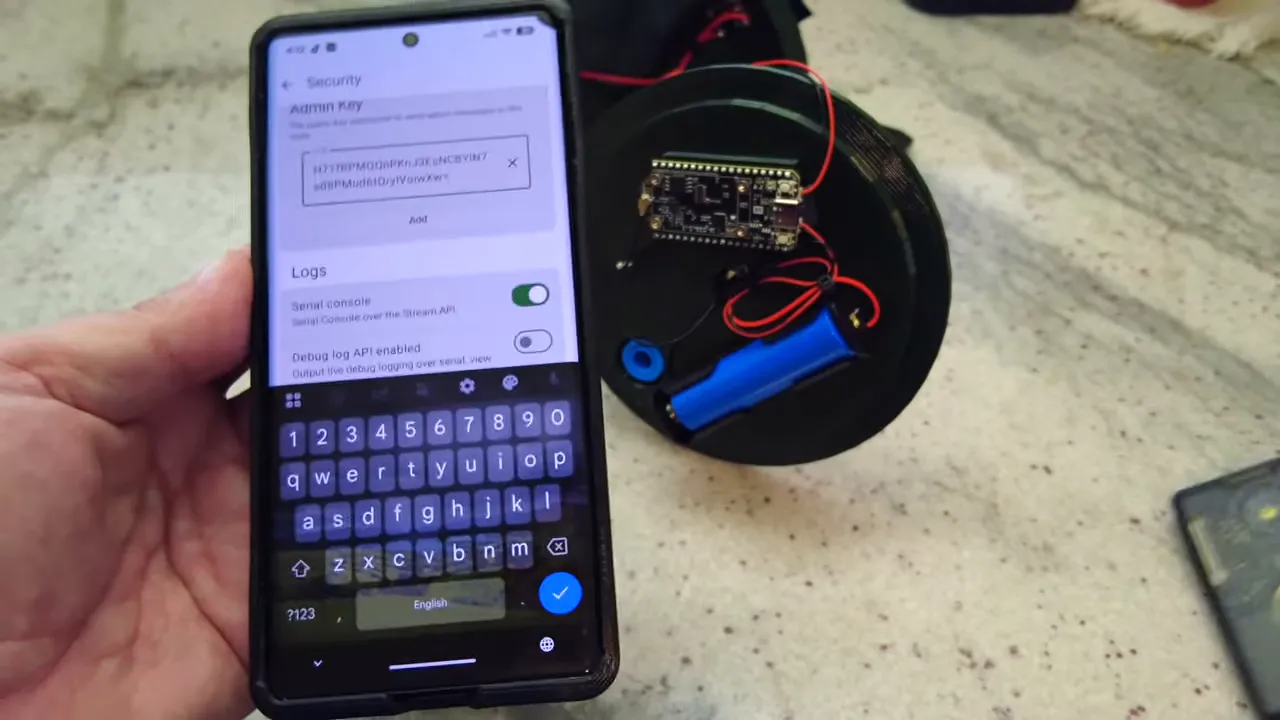
Step 2: Add that public key to the remote node’s admin keys
Now connect to the node you want to manage remotely. In this case, that is the Heltec V4.
Again, go into Security. This time, instead of copying a key, you want to add an admin key.
Paste the public key you copied from the T1000E into that admin key field, then save it.
That is really the core configuration. Once the admin node’s public key has been added to the remote node, you have established permission for Meshtastic, Remote Management.
You can add up to three admin keys, which is handy if you want multiple trusted admin nodes.
Step 3: Reconnect to the admin node
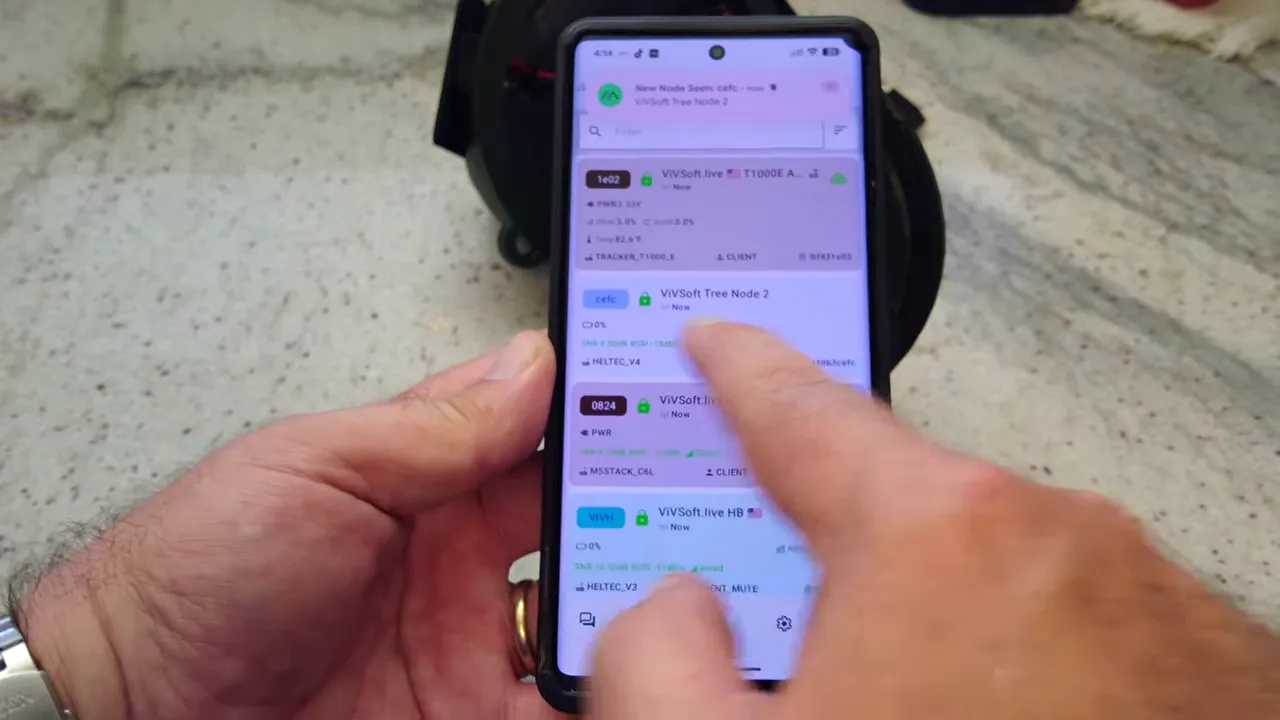
After saving the admin key on the remote node, disconnect from it and reconnect your app to the admin node, the T1000E.
From here on, you are going to try to find the remote node through the mesh. If it does not show up immediately, that is normal.
In the example setup, the target node did not appear right away in the node list. The simple fix was to reboot the remote node so it would announce itself to the network again.
Step 4: Reboot the remote node so it publishes itself
If your admin node does not see the remote node yet, restart the remote device.
When the remote node boots, one of the first things it does is send out its presence on the network. That makes it visible to the admin node again.
After the reboot, the node appeared in the list and was ready to be managed.
Step 5: Exchange metadata, then open remote management
Once the remote node appears under your admin node, open that node and look near the bottom for Administration.
The first useful action here is Metadata. Triggering metadata exchange helps the admin node learn the information it needs about the remote device.
After metadata comes through, select Remote Management. If the keys match properly, the app will switch into remote mode for that node.
You will see the interface indicate that you are now remotely managing the target node. At that point, your phone is still connected to the admin node over Bluetooth, but the settings changes are being sent to the remote node over LoRa.
That is the big win with Meshtastic, Remote Management. You are no longer limited to physical Bluetooth access for every change.
What you can do once remote management is active
Once connected in remote management mode, the remote node behaves a lot like a directly connected node from a settings perspective. You can open different configuration sections and change values just as you normally would.
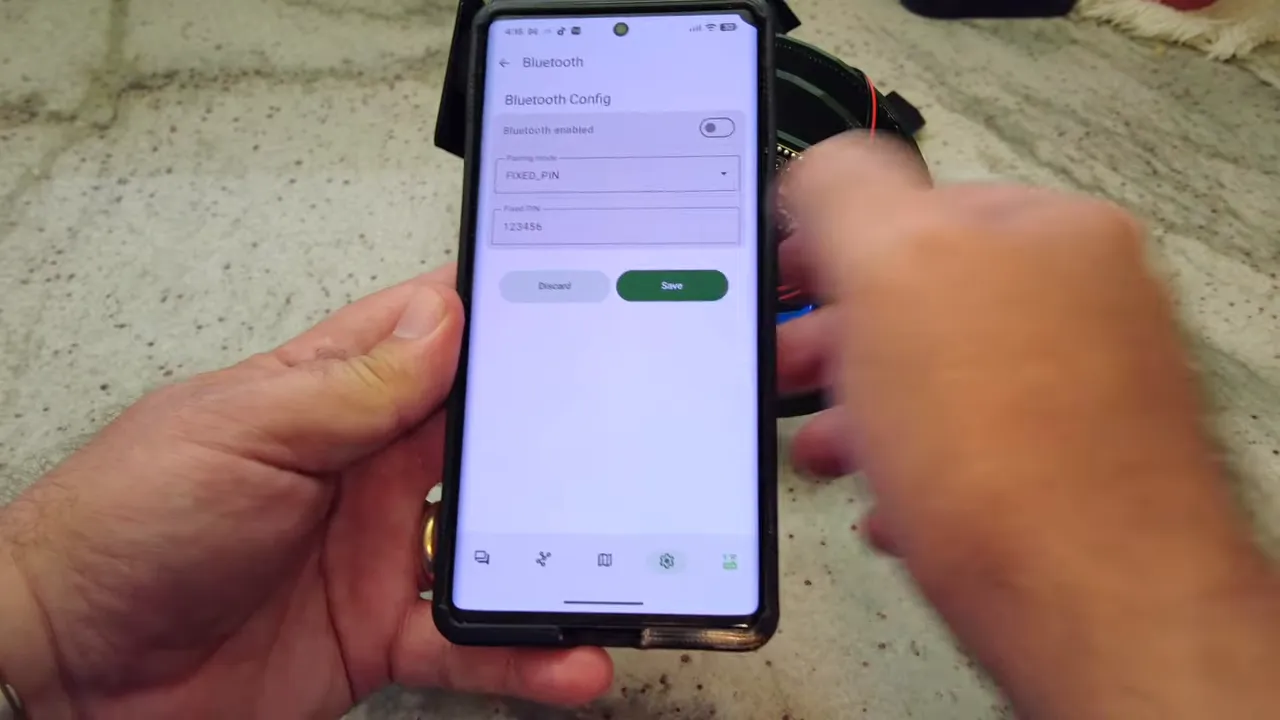
One very practical example is Bluetooth.
Turn Bluetooth off on the remote node
In the example, Bluetooth was disabled on the Heltec V4 while it was being managed remotely.
That means the node could no longer be connected to directly over Bluetooth afterward. From then on, access depended on remote management through the admin node.
This is useful when you want to reduce exposure, simplify field deployments, or prevent the need to leave Bluetooth enabled on a permanently mounted node.
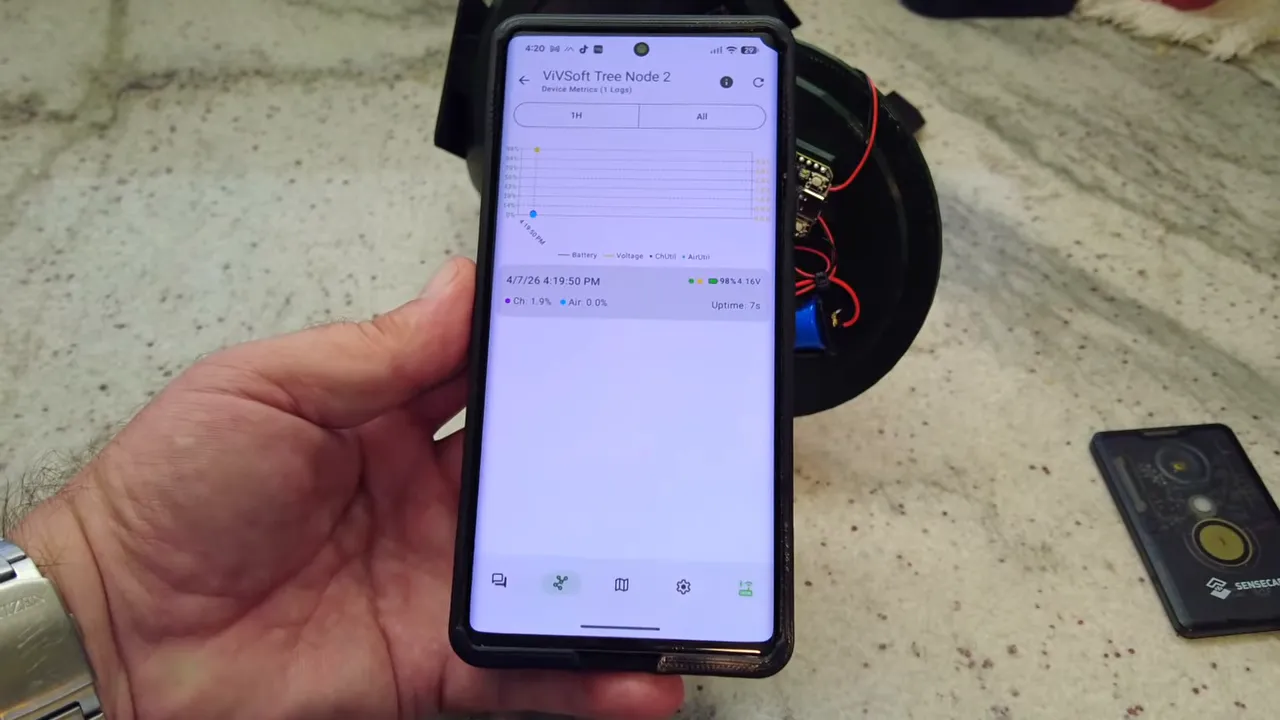
Checking device metrics remotely
After Bluetooth was turned off, the next test was to read device metrics such as battery state and air utilization.
At first, nothing came through. That is an important little gotcha.
If you want to monitor those values with Meshtastic, Remote Management, the remote node must actually be configured to send telemetry data.
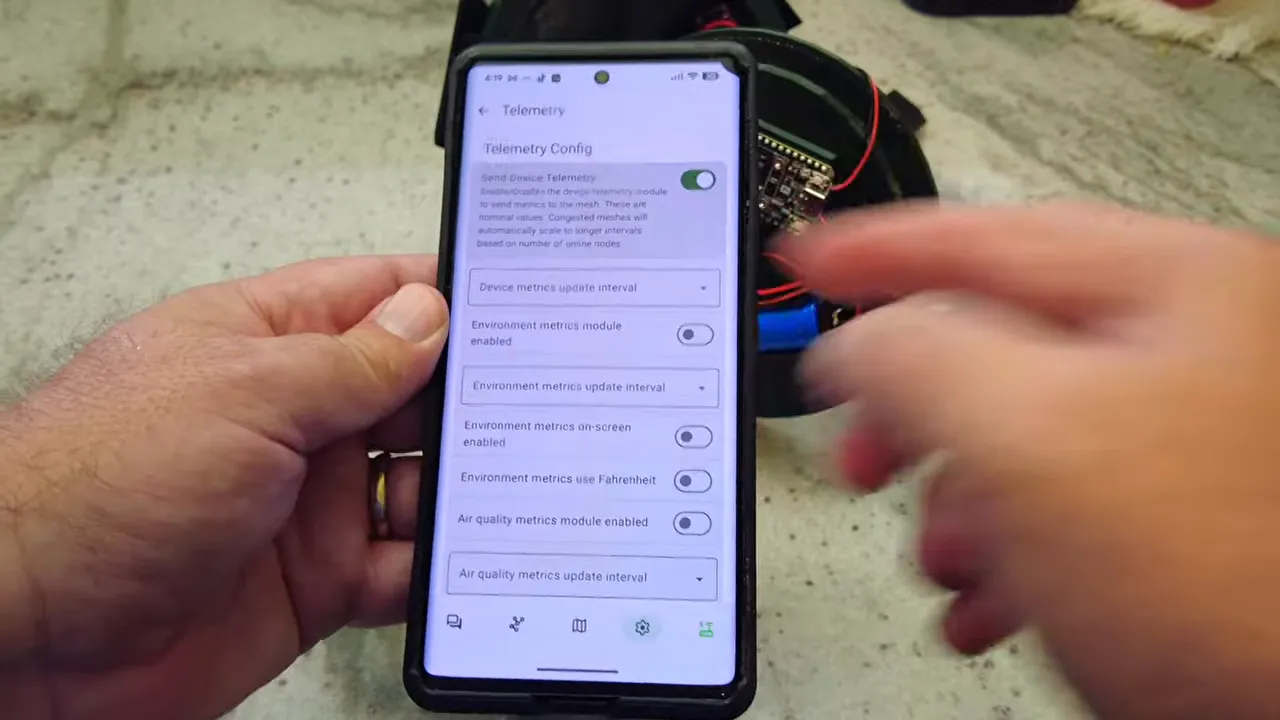
If metrics are missing, enable telemetry
Go back into remote management for the remote node and open the Telemetry settings. Then turn on the option to send telemetry data and save it.
Because this setting is being changed remotely, the save action is sent over the LoRa network to the target node. After that change, the node reboots.
Once it comes back up, device metrics become available from the admin node.
What you can monitor after telemetry is enabled
With telemetry enabled, the admin node can read useful health data from the remote node, including:
- Battery percentage
- Battery voltage
- Uptime
- Air utilization
In the example, the remote Heltec reported battery around 98%, then 97% after repeated refreshes. That is a nice reminder that constantly polling a node is not free. If you keep hammering on it, you will see the battery tick down.
There was also an indication that, while staying connected, metrics update automatically on a regular interval, roughly around once a minute.
That gives you a very practical way to check the health of a remote deployment without physically touching it.
Why this matters for real deployments
This is where Meshtastic, Remote Management really shines.
If you have a node mounted in a tree, on a roof, inside a weatherproof box, or somewhere you simply do not want to access all the time, remote management means you can:
- Change settings over the mesh
- Disable Bluetooth after deployment
- Enable or adjust telemetry remotely
- Check battery and uptime without taking the node down
- Manage multiple nodes from one admin node
That is a much cleaner way to run longer-term installations. Set the trust relationship once, verify the node is visible on the network, and then manage it from your admin node instead of climbing ladders or opening enclosures every time you need to tweak something.
Quick Meshtastic remote management setup checklist
- Connect to your admin node in the app.
- Open Security and copy its public key.
- Connect to the remote node.
- Open Security and add that public key as an admin key.
- Save the setting.
- Reconnect to the admin node.
- If the remote node does not appear, reboot the remote node.
- Open the node, request Metadata, then select Remote Management.
- Change settings over LoRa as needed.
- If you want battery and health data, enable Telemetry on the remote node.
Common gotchas to remember
- If the remote node is not visible, reboot it so it republishes itself to the mesh.
- If remote management does not open, double-check that the correct public key was added as an admin key.
- If device metrics are blank, telemetry probably is not enabled yet.
- If you turn Bluetooth off, direct local access is gone unless you turn it back on remotely or reconnect some other way later.
FAQ
What is Meshtastic, Remote Management?
It is the ability to manage one Meshtastic node through another. Your phone connects to an admin node over Bluetooth, and that admin node sends management commands to a remote node over LoRa.
What do I need to set up remote management?
You need an admin node, a target node, and the Meshtastic app. The essential setup step is copying the admin node’s public key and adding it to the target node as an admin key in the Security settings.
Why can’t I see my remote node from the admin node?
If the node does not show up, reboot the remote node. On startup it sends out its presence to the mesh, which helps the admin node discover it.
Why are device metrics not showing up?
The remote node needs telemetry enabled. Go into remote management, open Telemetry, turn on sending telemetry data, and save the setting.
Can I turn Bluetooth off on a node and still manage it?
Yes, as long as Meshtastic, Remote Management is already configured and the node is reachable over the mesh. In the example setup, Bluetooth was turned off and the node remained manageable through the admin node over LoRa.
How many admin keys can a node store?
You can add up to three admin keys.
Useful links
Links: (Note: As an affiliate, I earn from qualifying purchases)